Avenger96 Image Programming: Difference between revisions
Mschmoeller (talk | contribs) Created page with " == Introduction == This guide is about how to flash the AV96 board with STM32 Cube Programmer. == Install STM32 Cube Programmer == Download the installer from the [https:..." |
Mschmoeller (talk | contribs) No edit summary |
||
| Line 1: | Line 1: | ||
== Introduction == | == Introduction == | ||
This guide is about how to flash the AV96 board with STM32 Cube Programmer. | This guide is about how to flash the AV96 board with STM32 Cube Programmer. | ||
| Line 6: | Line 7: | ||
== Install STM32 Cube Programmer == | == Install STM32 Cube Programmer == | ||
Download the installer from the [https://www.st.com/en/development-tools/stm32cubeprog.html official STM32 Cube Programmer site]. | Download the installer from the [https://www.st.com/en/development-tools/stm32cubeprog.html official STM32 Cube Programmer site]. | ||
Follow ST's installation instructions. | Follow ST's installation instructions. | ||
== Get the images == | == Get the images == | ||
Build your own Yocto image by using the following source and on GitHub: [https://github.com/dh-electronics/meta-av96 AV96 Yocto Layer] | Build your own Yocto image by using the following source and on GitHub: [https://github.com/dh-electronics/meta-av96 AV96 Yocto Layer] | ||
Instructions how to build the image can be found in the repository readme. | Instructions how to build the image can be found in the repository readme. | ||
| Line 20: | Line 26: | ||
To get access to your target with the STM32 Cube Programmer you need to switch the AV96 boot mode to USB boot: | To get access to your target with the STM32 Cube Programmer you need to switch the AV96 boot mode to USB boot: | ||
[[File:AV96USBBootswitch.png|700px]] | [[File:AV96USBBootswitch.png|700px]] | ||
Then connect the USB-C interface of the AV96 board to your computer and power on your device. | |||
== Programm the image with STM32 Cube Programmer == | == Programm the image with STM32 Cube Programmer == | ||
Start the STM32 Cube Programmer Tool. | |||
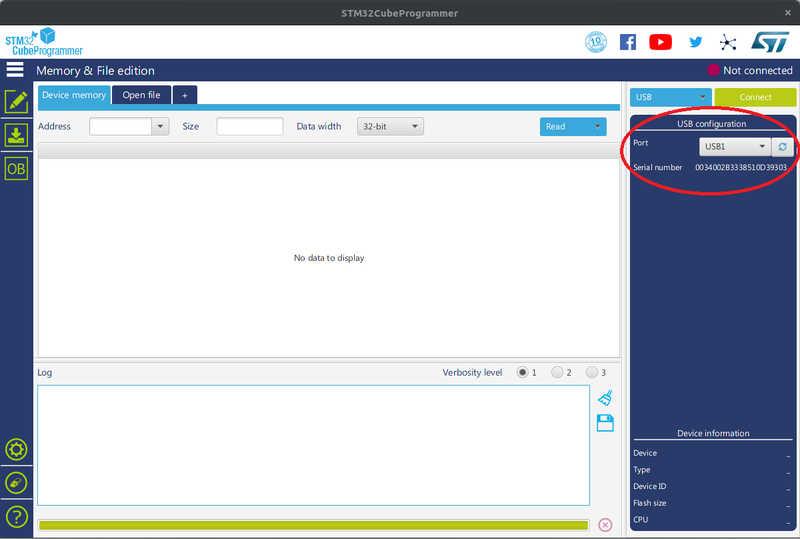
If your device is connected correctly, you should be able to see the available USB Port: | |||
[[File:AV96USBConnect.png|800px]] | |||
If not, check your connection and boot mode configuration, then press the refresh button on the right. | |||
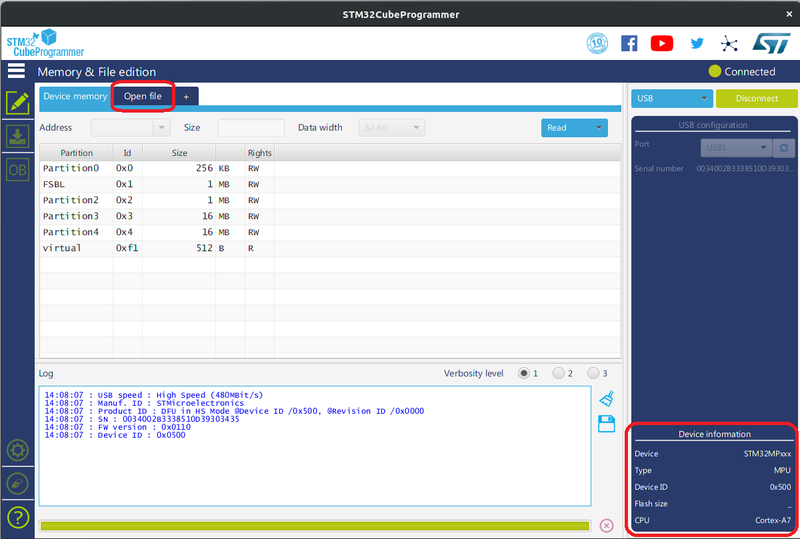
Continue by clicking the green "Connect" button on the right. | |||
[[File:AV96USBConnected.png|800px]] | |||
Check the device informations on the right bottom side after a successful connection, then click on the "Open file" Header. | |||
Choose the wanted flash layout from your Yocto build | |||
. | |||
For example: FlashLayout_nor-emmc_stm32mp157a-av96-basic.tsv (U-Boot -> NOR-SPI, Linux -> eMMC) | |||
These layouts you can find in the following directory of your build: | |||
$YOCTO_HOME/build-openstlinuxweston-stn32mp1-av96/tmp-glibc/deploy/images/stm32mp1-av96/flashlayout_av96-weston/ | |||
[[File:AV96Flashlayout.png|800px]] | |||
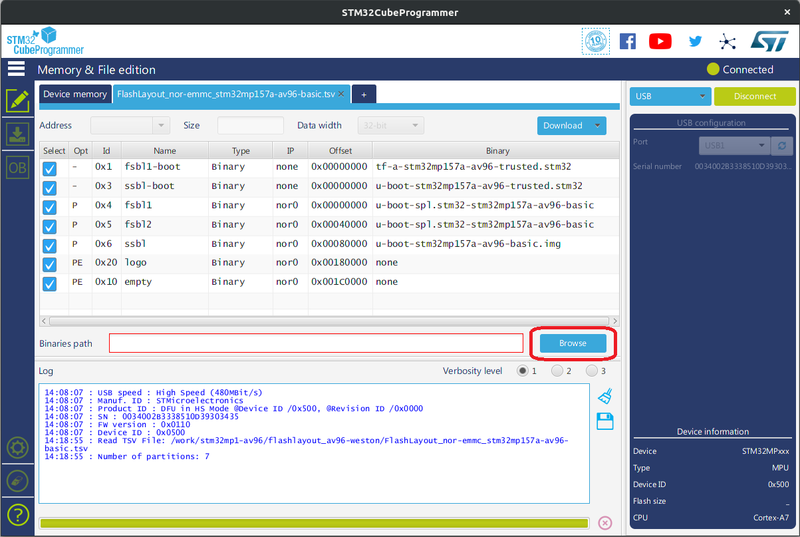
You should be able to see the files, destinations and address offsets which have to be programmed. | |||
If you dont want them all to be flashed, unselect the checkboxes on the left of the wanted partition. | |||
You need to choose the "Binaries path" of the images to be flashed by clicking on the browse button or fill it in manually. | |||
For Yocto this is the following directory: | |||
$YOCTO_HOME/build-openstlinuxweston-stn32mp1-av96/tmp-glibc/deploy/images/stm32mp1-av96 | |||
At last click on "Download" to flash your device. | |||
You will get a status message whether your flash process was successful or not. | |||
If you want to boot your device please don't forget to switch the boot mode. | |||
Revision as of 13:37, 20 August 2019
Introduction
This guide is about how to flash the AV96 board with STM32 Cube Programmer.
Install STM32 Cube Programmer
Download the installer from the official STM32 Cube Programmer site.
Follow ST's installation instructions.
Get the images
Build your own Yocto image by using the following source and on GitHub: AV96 Yocto Layer
Instructions how to build the image can be found in the repository readme.
Once you have built your own AV96 Yocto image, your build provides all the files you need to use the Cube Programmer.
Prepairing the target device
To get access to your target with the STM32 Cube Programmer you need to switch the AV96 boot mode to USB boot:
Then connect the USB-C interface of the AV96 board to your computer and power on your device.
Programm the image with STM32 Cube Programmer
Start the STM32 Cube Programmer Tool.
If your device is connected correctly, you should be able to see the available USB Port:
If not, check your connection and boot mode configuration, then press the refresh button on the right.
Continue by clicking the green "Connect" button on the right.
Check the device informations on the right bottom side after a successful connection, then click on the "Open file" Header.
Choose the wanted flash layout from your Yocto build . For example: FlashLayout_nor-emmc_stm32mp157a-av96-basic.tsv (U-Boot -> NOR-SPI, Linux -> eMMC)
These layouts you can find in the following directory of your build:
$YOCTO_HOME/build-openstlinuxweston-stn32mp1-av96/tmp-glibc/deploy/images/stm32mp1-av96/flashlayout_av96-weston/
You should be able to see the files, destinations and address offsets which have to be programmed.
If you dont want them all to be flashed, unselect the checkboxes on the left of the wanted partition.
You need to choose the "Binaries path" of the images to be flashed by clicking on the browse button or fill it in manually.
For Yocto this is the following directory:
$YOCTO_HOME/build-openstlinuxweston-stn32mp1-av96/tmp-glibc/deploy/images/stm32mp1-av96
At last click on "Download" to flash your device.
You will get a status message whether your flash process was successful or not.
If you want to boot your device please don't forget to switch the boot mode.


