COM iMX6 WinCE
From Wiki-DB
FAQ
WEC7 Tools
CE Remote Display Application
- The Remote Display allows to operate the target device's Win CE desktop from a Windows PC. It requires a USB ActiveSync connection.
- Download X86 remote display application (over ActiveSync connection)
- Usage
- 1. Extract the zip file on your PC.
- 2. Wait for the ActiveSync connection to be ready.
- 3. Start ASRDisp.exe.
Binary BSP user guide
- 1. Download binary BSP (Please have a look at the iMX6 Downloads section.).
- 2. Unzip the files to any folder on your PC.
- 3. Call
link-DHCOM_iMX6_BIN_GEN.batfile in the folder ...\DHCOM_iMX6_BSP_BIN\, to generate symbolic links in the \WINCE700\ folder. - 4. Start Visual Studio 2008 with WEC7 platform builder.
- 5. Open platform builder project
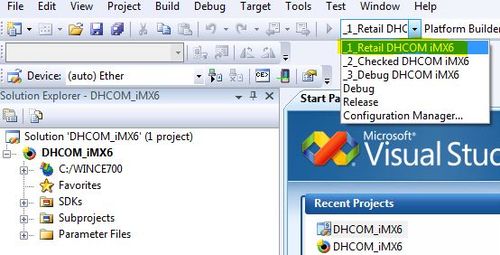
DHCOM_iMX6.pbxmlat location C:\WINCE700\OSDesigns\DHCOM_iMX6_WEC7\. - 6. Select retail build.
- 7. Call build --> rebuild solution to build the WEC7 image.
- 8. After the image build has completed successfully, the
nk.nb0image is stored at location C:\WINCE700\OSDesigns\DHCOM_iMX6_WEC7\RelDir\_1_Retail_DHCOM_iMX6_ARMV7\. - 9. Copy the new nk.nb0 to your mircoSD card and restart the system.
- Note: To delete the symbolic links (see 3.) please call
unlink-DHCOM_iMX6_BIN_GEN.batfile in the folder ...\DHCOM_iMX6_BSP_BIN\
WEC7 DHHalLib (function library)
The DHHalLib provides hardware related functions for Windows Embedded CE 6 and Windows Embedded Compact 7. All the functionality is available from the user mode.
Version numbers
- Read DHHalLib version
unsigned long DHHalLibGetVersion()
- Return value:
unsigned long--> version number (e.g. 0x01040001 for version 1.4.0.1)
- BSP version
unsigned long BSPGetVersion()
- Return value:
unsigned long--> version number (e.g. 0x01040001 for version 1.4.0.1) - Note: The version number information is stored in the following registry key:
[HKEY_LOCAL_MACHINE\Ident] dword:"BSPVersionNumber"
- Read image version
unsigned long WinCEImageGetVersion()
- Return value:
unsigned long--> version number (e.g. 0x01040001 for version 1.4.0.1)
GPIO
- Note: These functions can only access the DHCOM standard GPIOs. The mapping is done with the following enum.
  typedef enum DHCOM_GPIOEnum
  {
    DHCOM_GPIO_A,
    DHCOM_GPIO_B,
    DHCOM_GPIO_C,
    DHCOM_GPIO_D,
    DHCOM_GPIO_E,
    DHCOM_GPIO_F,
    DHCOM_GPIO_G,
    DHCOM_GPIO_H,
    DHCOM_GPIO_I,
    DHCOM_GPIO_J,
    DHCOM_GPIO_K,
    DHCOM_GPIO_L,
    DHCOM_GPIO_M,
    DHCOM_GPIO_N,
    DHCOM_GPIO_O,
    DHCOM_GPIO_P,
    DHCOM_GPIO_Q,
    DHCOM_GPIO_R,
    DHCOM_GPIO_S,
    DHCOM_GPIO_T,
    DHCOM_GPIO_U,
    DHCOM_GPIO_V,
    DHCOM_GPIO_W,
    DHCOM_GPIO_NOT_DEFINED
  }*pDHCOM_GPIOEnum;
- Direction
bool GPIOSetDirection( DHCOM_GPIOEnum eGpio, bool bInOut, bool bDefaultState)
- Input values:
DHCOM_GPIOEnum eGpio= DHCOM GPIO pin namebool bInOut= GPIO direction (1 = input / 0 = output)bool bDefaultState= Default state (0 = low / 1 = high)
- Return value:
bool--> true = success; false = failed
- Set state
void GPIOSetPin(DHCOM_GPIOEnum eGpio, bool bState)
- Input values:
DHCOM_GPIOEnum eGpio= DHCOM GPIO pin namebool bState= pin state ( 0 = low / 1 = high)
- Read state
bool GPIOGetPin(DHCOM_GPIOEnum eGpio)
- Input values:
DHCOM_GPIOEnum eGpio= DHCOM GPIO pin name
- Return value:
bool--> 0 = low; 1 = high
- Set Interrupt
bool GPIOSetInterrupt(DHCOM_GPIOEnum eGpio, HANDLE *hEvent, unsigned long ulTimeout)
- Input values:
DHCOM_GPIOEnum eGpio= DHCOM GPIO pin nameHANDLE *hEvent= external EventHandle Pointerbool bState= GPIO Interrupt State
- Return value:
bool--> true = success; false = failed
- Clear Interrupt
bool GPIOClearInterrupt(DHCOM_GPIOEnum eGpio)
- Note: Gpio Interrupt cannot disable by Hardware.
- Input values:
DHCOM_GPIOEnum eGpio= DHCOM GPIO pin name
- Return value:
bool--> true = success; false = failed
I2C
- Note: These I2C Devices can only be set. The mapping is done with the following enum.
  typedef enum DHCOM_I2CEnum
  {
   DHCOM_I2C0=0,
   DHCOM_I2C1,
   DHCOM_I2C2,
   DHCOM_I2C3,
   DHCOM_I2C_NOT_DEFINED
  }*pDHCOM_I2CEnum;
- Note: These freqencies can only be set. The mapping is done with the following enum.
  typedef enum DHCOM_I2CFREQMode
  {
   I2C_100K=0,
   I2C_400K,
   I2C_800K,I2C_1600K,
   I2C_2400K,
   I2C_3200K
  }*pDHCOM_I2CFREQMode;
- Open
bool I2COpen(DHCOM_I2CEnum eI2CPort, DHCOM_I2CFREQMode eI2CFreq)
- Input values:
DHCOM_I2CEnum eI2CPort= DHCOM I2C port name (e.g. DHCOM_I2C0)DHCOM_I2CFREQMode eI2CFreq= DHCOM I2C port freqency name(e.g. I2C_100K)
- Return value:
bool--> true = success; false = failed
- Close
void I2CClose(DHCOM_I2CEnum eI2CPort)
- Input values:
DHCOM_I2CEnum eI2CPort= DHCOM I2C port name (e.g. DHCOM_I2C0)
- Read
bool I2CRead(DHCOM_I2CEnum eI2CPort, DHCOM_I2CFREQMode eI2CFreq, unsigned char cDevId, unsigned char cI2CReg, unsigned char *pOutBuffer)
- Input values:
DHCOM_I2CEnum eI2CPort= DHCOM I2C port name (e.g. DHCOM_I2C0)DHCOM_I2CFREQMode eI2CFreq= DHCOM I2C port freqency name(e.g. I2C_100K)unsigned char cDevId= I2C device address (0..127)unsigned char cI2CReg= I2C device register address (0..255)unsigned char *pOutBuffer= Pointer to the read byte
- Return value:
bool--> true = success; false = failed
- Write
bool I2CWrite(DHCOM_I2CEnum eI2CPort, DHCOM_I2CFREQMode eI2CFreq, unsigned char cDevId, unsigned char cI2CReg, unsigned char cValue)
- Input values:
DHCOM_I2CEnum eI2CPort= DHCOM I2C port name (e.g. DHCOM_I2C0)DHCOM_I2CFREQMode eI2CFreq= DHCOM I2C port freqency name(e.g. I2C_100K)unsigned char cDevId= I2C device address (0..127)unsigned char cI2CReg= I2C device register address (0..255)unsigned char cValue= Value to be written
- Return value:
bool--> true = success; false = failed
- Read multiple bytes
bool I2CReadMultipleBytes(DHCOM_I2CEnum eI2CPort, DHCOM_I2CFREQMode eI2CFreq, unsigned char cDevId, unsigned char cI2CReg, unsigned char cBytes, unsigned char *pOutBuffer)
- Input values:
DHCOM_I2CEnum eI2CPort= DHCOM I2C port name (e.g. DHCOM_I2C0)DHCOM_I2CFREQMode eI2CFreq= DHCOM I2C port freqency name(e.g. I2C_100K)unsigned char cDevId= I2C device address (0..127)unsigned char cI2CReg= I2C device register address (0..255)unsigned char cBytes= Number of bytes to be read (max. 255)unsigned char *pOutBuffer= Pointer to the read buffer
- Return value:
bool--> true = success; false = failed
- Write multiple bytes
bool I2CWriteMultipleBytes(DHCOM_I2CEnum eI2CPort, DHCOM_I2CFREQMode eI2CFreq, unsigned char cDevId, unsigned char cI2CReg, unsigned char cBytes, unsigned char *pInBuffer)
- Input values:
DHCOM_I2CEnum eI2CPort= DHCOM I2C port name (e.g. DHCOM_I2C0)DHCOM_I2CFREQMode eI2CFreq= DHCOM I2C port freqency name(e.g. I2C_100K)unsigned char cDevId= I2C device address (0..127)unsigned char cI2CReg= I2C device register address (0..255)unsigned char cBytes= Number of bytes to be read (max. 255)unsigned char *pInBuffer= Pointer to the input buffer
- Return value:
bool--> true = success; false = failed
SPI
- Note: These SPI Devices can only be set. The mapping is done with the following enum.
  typedef enum DHCOM_SPIEnum
  {
       DHCOM_SPI1=0,
       DHCOM_SPI2,
       DHCOM_SPI_NOT_DEFINED
  }*pDHCOM_SPIEnum;
- Note: These chip selects can be set. The mapping is done with the following enum.
   typedef enum DHCOM_SPIModeEnum
   {
       SPI_CS0=0,
       SPI_CS1,
       SPI_CS2,
       SPI_CS3
   }*pDHCOM_SPIModeEnum;
- Open
bool SPIOpen(DHCOM_SPIEnum eSPIPort, DHCOM_SPIModeEnum eSPIMode, unsigned int iSPIFreq)
- Input values:
DHCOM_SPIEnum eSPIPort= DHCOM SPI port name (e.g. DHCOM_SPI1)DHCOM_SPIModeEnum eSPIMode= DHCOM SPI mode name(e.g. DHCOM_CS0)unsigned int iSPIFreq= DHCOM SPI frequency (e.g. 16MHz = 16000000)
- Return value:
bool--> true = success; false = failed
- Close
void SPIClose(DHCOM_SPIEnum eSPIPort)
- Input values:
DHCOM_SPIEnum eSPIPort= DHCOM SPI port name (e.g. DHCOM_SPI1)
- Read
bool SPIRead(DHCOM_SPIEnum eSPIPort, unsigned int *pOutBuffer)
- Input values:
DHCOM_SPIEnum eSPIPort= DHCOM SPI port name (e.g. DHCOM_SPI1)unsigned int *pOutBuffer= Pointer to the output buffer
- Return value:
bool--> true = success; false = failed
- Write
bool SPIWrite(DHCOM_SPIEnum eSPIPort, unsigned int *pInBuffer, unsigned int *pOutBuffer, bool bLoopback)
- Input values:
DHCOM_SPIEnum eSPIPort= DHCOM SPI port name (e.g. DHCOM_SPI1)unsigned int *pInBuffer= Pointer to the input bufferunsigned int *pOutBuffer= Pointer to the output buffer (If not Loopback used = NULL)bool bLoopback= Enable/Disable Loopback transmission
- Return value:
bool--> true = success; false = failed
- Read multiple bytes
bool SPIReadMultiple(DHCOM_SPIEnum eSPIPort, unsigned int iWCount, unsigned int *pOutBuffer)
- Input values:
DHCOM_SPIEnum eSPIPort= DHCOM SPI port name (e.g. DHCOM_SPI1)unsigned int iWCount= Number of bytes to read (max. 1024 Bytes)unsigned int *pOutBuffer= Pointer to the output buffer
- Return value:
bool--> true = success; false = failed
- Write multiple bytes
bool SPIWriteMultiple(DHCOM_SPIEnum eSPIPort, unsigned int *pOutBuffer, unsigned int iWCount)
- Input values:
DHCOM_SPIEnum eSPIPort= DHCOM SPI port name (e.g. DHCOM_SPI1)unsigned int *pOutBuffer= Pointer to the output buffer
- Return value:
bool--> true = success; false = failed
- Read bytes from NOR Flash
bool SPIReadNORFlash(DHCOM_SPIEnum eSPIPort, unsigned int iSPIReg, unsigned int iWCount, unsigned int *pOutBuffer)
- Input values:
DHCOM_SPIEnum eSPIPort= DHCOM SPI port name (e.g. DHCOM_SPI1)unsigned int iSPIReg= SPI NOR Flash Start Address (0..65565)unsigned int iWCount= Number of bytes to read (max. 1024 Bytes)unsigned int *pOutBuffer= Pointer to the output buffer
- Return value:
bool--> true = success; false = failed
- Write bytes to NOR Flash
bool SPIWriteNORFlash(DHCOM_SPIEnum eSPIPort, unsigned int iSPIReg, unsigned int *pOutBuffer, unsigned int iWCount)
- Input values:
DHCOM_SPIEnum eSPIPort= DHCOM SPI port name (e.g. DHCOM_SPI1)unsigned int iSPIReg= SPI NOR Flash Start Address (0..65565)unsigned int *pOutBuffer= Pointer to the output buffer
- Return value:
bool--> true = success; false = failed
Physical Memory
- Note: These freqencies can only be set. The mapping is done with the following enum.
   typedef enum DHCOM_PHYEnum
   {
       DHCOM_PHY1=1,
       DHCOM_PHY2,
       DHCOM_PHY3,
       DHCOM_PHY4,
       DHCOM_PHY5,
       DHCOM_PHY6,
       DHCOM_PHY7,
       DHCOM_PHY8,
       DHCOM_PHY9
   }*pDHCOM_PHYEnum;
- Write Physical Address
int WritePhysicalAddress(DHCOM_PHYEnum PHYDev, unsigned long ulPhyAddr, unsigned char cRegSize, int iValue, bool bReadBack)
- Input values:
DHCOM_PHYEnum PHYDev= DHCOM PHY Device name (e.g. DHCOM_PHY1)unsigned long ulPhyAddr= Physical Address to write (e.g. GPIO1_MASK_REG = 0x209c014)unsigned char cRegSize= Register Size (8 = 8bit, 16 = 16bit, 32 = 32bit)int iValue= Value for Physical Address to writebool bReadBack= Enable/Disable Readback function (enable = true -> disable = false)
- Return value:
int--> returns the written value from the specified Physical Address - if bReadBack == TRUE, else 0x0 will be returned
- Read Physical Address
int ReadPhysicalAddress(DHCOM_PHYEnum PHYDev, unsigned long ulPhyAddr, unsigned char cRegSize)
- Input values:
DHCOM_PHYEnum PHYDev= DHCOM PHY Device name (e.g. DHCOM_PHY1)unsigned long ulPhyAddr= Physical Address to write (e.g. GPIO1_MASK_REG = 0x209c014)unsigned char cRegSize= Register Size (8 = 8bit, 16 = 16bit, 32 = 32bit)
- Return value:
int--> returns the value from the specified Physical Address
KITL
- Restart
bool RestartPowerKITL()
- Input values:
- Return value:
bool--> true = success; false = failed
- Control
bool ControlPowerKITL(bool bEnable)
- Input values:
bool bEnable= Enable/Disable KITL Connection
- Return value:
bool--> true = success; false = failed
Backlight
- Backlight Level
bool SetBacklightLevel(int Level)
- Note: In DHHalLib Version 1.0.0.0 only Backlight Enable/Disable available. (Value 0 = Disable, Value 1 to 255 = Enable)
- Input values:
int Level= Backlight Level (0 ... 255)
- Return value:
bool--> true = success; false = failed
- Backlight Timeout
bool SetBacklightSuspend(int Timeout, bool bEnable)
- Note: In DHHalLib Version 1.0.0.0 not available.
- Input values:
int Timeout= Timeout for Backlight (seconds)bool bEnable= Enable/Disable Timeout Backlight --> true = On; false = Off
- Return value:
bool--> true = success; false = failed
Touch screen
- Calibrate touch
bool CalibrateTouch()
- Return value:
bool--> true = success; false = failed
- Clear calibration data
bool ClearTouchCalibrationData()
- Description:
- This function delete the registry entry
[HKEY_LOCAL_MACHINE\HARDWARE\DEVICEMAP\TOUCH] dword:"TouchCalibrationDone". For saving the value permanent please callSaveRegistry()afterwards.
- This function delete the registry entry
- Return value:
bool--> true = success; false = failed
Registry
- Save HIVE registry
bool SaveRegistry()
- Return value:
bool--> true = success; false = failed
- Create backup
bool CreateRegistryBackup()
- Description:
- This function generates the files ave_HKLM_Reg.srg and Save_HKLCU_Reg.srg in the folder \Storage Card\. These files can be used at a later time to restore the registry.
- Return value:
bool--> true = success; false = failed
- Restore backup
bool RestoreRegistryBackup()
- Description:
- This function restores the registry from the files Save_HKLM_Reg.srg and Save_HKLCU_Reg.srg in the folder \Storage Card\. Afterwards a restart is carried out automatically. If the backup files are not present, then the function returns the return value flase.
- Return value:
bool--> true = this never happens because a soft reset is performed; false = failed
Watchdog & Reset
- Soft reset
void SoftReset()
WEC2013 Debugging
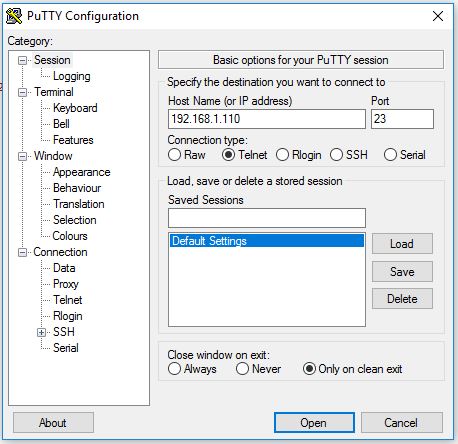
- 1. Enable connection to WEC2013 device via Telnet. DH electronics recommends PuTTY for Telnet connection.
- Notes: PuTTY can be downloaded from www.heise.de. Default IP address is 192.168.1.110. No Login is used with the testsystem.
- 2. Before the Remote Debug session can be started it is necessary to start two applications via the telnet connection, by using the following commands:
- START conmanclient3.exe
- START cmaccept3.exe
- NOTE: If you boot up the device, you have to start the service conmanclient3.exe once. The service cmaccept3.exe needs to be start before you will deploy or debug your application. The service cmaccept3.exe is closed automatically after 3 minutes. Be sure to connect your application with the device during this time period. Otherwise you have to start the cmaccept3.exe again. The files are stored in folder \windows\ at testimage.
- 3. Now the debug session can be started from visual studio.
WEC2013 VNC Connection
With WEC2013 efonVNC is used for remote desktop connection. For more information and license click here.
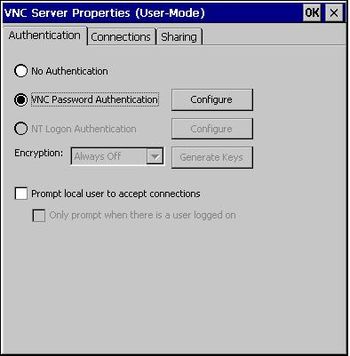
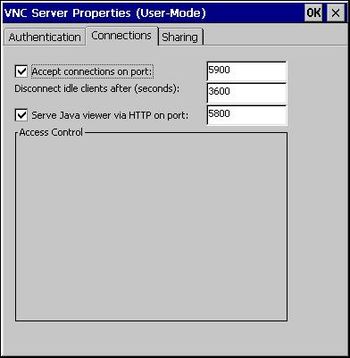
- 1. vncconfig.exe can be used to configure password and connection details (stored in folder \apps\wec2013\ at testimage).
- 2. winvnc.exe (stored in folder \apps\wec2013\ at testimage) must be started. This is done atomatically at startup with the testimage. Otherwise the application can be started via telnet.
- 3. Download VNC viewer provided by RealVNC for PC/Laptop from here. For more information and license click here.
- 4. Run VNC viewer application and connect the device by using IP address and port number.
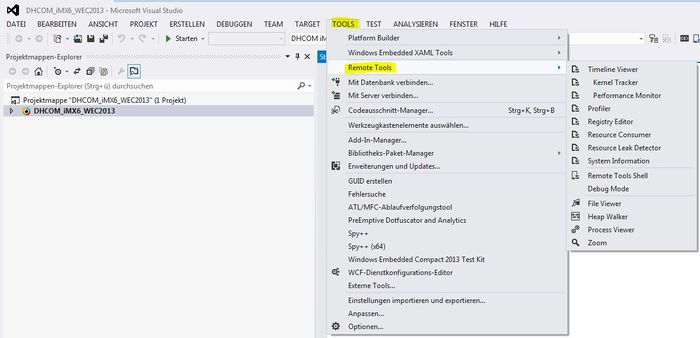
WEC2013 Remote Tools
Before remote tools can be used, it is necessary to sstart some applications on WEC2013 Device.
- 1. Enable connection to WEC2013 device via Telnet. DH electronics recommends PuTTY for Telnet connection.
- Notes: PuTTY can be downloaded from www.heise.de. Default IP address is 192.168.1.110. No Login is used with the testsystem.
- 2. Before the Remote Debug session can be started it is necessary to start two applications via the telnet connection, by using the following commands:
- START conmanclient3.exe
- START cmaccept3.exe
- NOTE: If you boot up the device, you have to start the service conmanclient3.exe once. The service cmaccept3.exe needs to be start before you will deploy or debug your application. The service cmaccept3.exe is closed automatically after 3 minutes. Be sure to connect your application with the device during this time period. Otherwise you have to start the cmaccept3.exe again. The files are stored in folder \windows\ at testimage.
- 3. Now it is possible to use remote tools from Visual Studio
WEC2013 Test Tools
TEST_APP_CANTEST
- The app can be used to test DHCOM CAN Port. The application is stored at folder \apps\wec2013\.
- Download CAN Demo source code
- CAN WRITE:
TEST_APP_CANTEST --write --len 8 --id 0x12 --idlen 11 --val 0x55 --remote 0
- Description of the example:
- --len: Send 8 Bytes
- --id: Message ID is 0x12
- --idlen: 11 = Standard ID; 29 can be used fpr extended ID
- --val: Data starts with 0x55, then 0x56, ...
- --remote: 0 = no remote frame
- Description of the example:
- CAN READ:
TEST_APP_CANTEST --read --timeout 10000
- Description of the example:
- The application waits for 10 seconds to receive data.
- Description of the example:
- CAN GET BITRATE:
TEST_APP_CANTEST --getbitrate
- Description of the example:
- The application shows the current used bitrate.
- Description of the example:
- CAN SET BITRATE:
TEST_APP_CANTEST --setbitrate --bitrate 250000
- Description of the example:
- The application sets bitrate to 250kbps.
- Description of the example:
UART_Test
- The app can be used to test DHCOM UART 2 Port. The application is stored at folder \apps\wec2013\.
UART_Test
- Description of the example:
- The application cyclic sends
"Hello World"and receives data. - The baudrate 115200 is used for the demo.
qmust be send to exit the demo.
- The application cyclic sends
- Description of the example:
