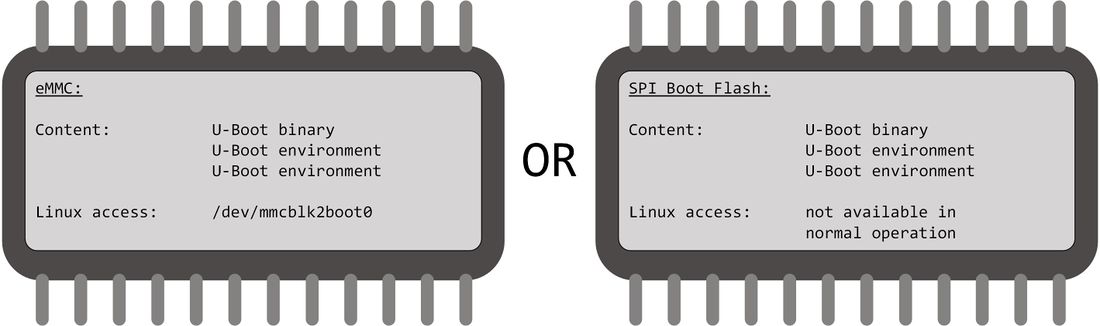
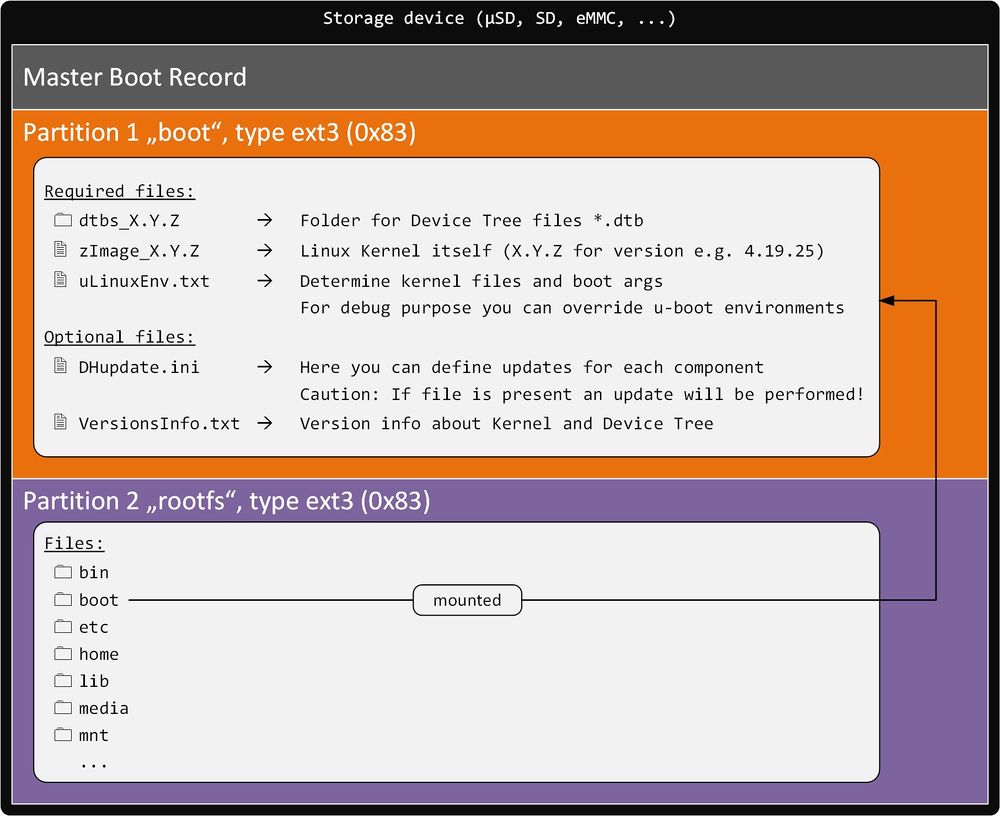
Storage Layout
Linux virtual machine for development
Linux Kernel
How to build a Kernel
|
Get sources from Github
Configure and build the Device Tree + Kernel
|
4. ARCH=arm CROSS_COMPILE=/opt/gcc-linaro-6.3.1-2017.05-x86_64_arm-linux-gnueabihf/bin/arm-linux-gnueabihf- make imx6ull_dhsom_defconfig
5. ARCH=arm CROSS_COMPILE=/opt/gcc-linaro-6.3.1-2017.05-x86_64_arm-linux-gnueabihf/bin/arm-linux-gnueabihf- make menuconfig (optional: If you want to add/remove Kernel features)
6. ARCH=arm CROSS_COMPILE=/opt/gcc-linaro-6.3.1-2017.05-x86_64_arm-linux-gnueabihf/bin/arm-linux-gnueabihf- make dtbs
7. ARCH=arm CROSS_COMPILE=/opt/gcc-linaro-6.3.1-2017.05-x86_64_arm-linux-gnueabihf/bin/arm-linux-gnueabihf- make zImage
|
|
Update the Kernel and Device Tree with U-Boot
- Please refere to the DHCOM Update Mechanism for i.MX6.
Update Kernel and Device Tree on a running Linux
Kernel
|
1. Copy the kernel zImage file to the path /boot (You can rename it after the Kernel version zImage_X.Y.Z)
2. Check zImage_file variable in /boot/uLinuxEnv.txt (e.g. zImage_file=zImage_4.19.25)
|
Device Tree
|
3. Copy the Device Tree *.dtb file to the path /boot/dtbs_X.Y.Z
4. Check fdt_file variable in /boot/uLinuxEnv.txt (e.g. fdtfile=/dtbs_4.19.25/imx6ull-dhcom-pdk2.dtb)
|
Reboot System
|
5. Restart the system (e.g. reboot)
|
|
Make your own Device Tree for your board
- The recommended proceeding for making your our Device Tree should be the following:
- 1. Clone the DH Device Tree Board file and change it to fit for your board
imx6ull-dhcom-pdk2.dts --> imx6ull-dhcom-BOARDNAME.dts
- 2. Add your new main Device Tree file to
Makefile (located in the same folder)
Debian Rootfilesystem
Available Rootfilesystems
- Please have a look at the iMX6ULL Images section.
Login
|
dhcom login: root
Password: foo
|
Reboot
- or
Shutdown
- or
- Note: If the watchdog is active, the system will be reset.
Kernel Userspace Interfaces to Access Hardware
Serial (UART) Interfaces
| DHCOM UART 1 |
/dev/ttymxc0
|
| DHCOM UART 2 |
/dev/ttymxc1
|
| DHCOM UART 3 |
<n/a>
|
I2C Interfaces
| DHCOM I2C 1 |
/dev/i2c-1
|
| DHCOM I2C 2 |
/dev/i2c-0
|
SPI Interfaces
| DHCOM SPI 1 |
/dev/spidev0.0
|
| DHCOM SPI 2 |
/dev/spidev1.0
|
- Remark: DHCOM SPI1 interface doesn‘t work with DHCOM Premium Developer Kit (HD00013).
- Reason: At DHCOM Premium Developer Kit SPI 1 isn‘t connected, because otherwise i.MX6 doesn‘t boot with the current schematic.
MMC/SD/eMMC Interfaces
| DHCOM SD-Interface
|
/dev/mmcblk1pX
|
| on module µSD Card
|
| on module eMMC |
/dev/mmcblk2pX
|
- 'X' has to be replaced with the partition number
Control the display brightness
- Coming soon
Control GPIOs
- See which gpio is already used by the system
| cat /sys/kernel/debug/gpio | grep -v "gpio-... ( "
|
| DHCOM Name: |
gpiod label: |
alt. DHCOM Name: |
SO-DIMM Pin# |
CPU Pad Name |
Linux <GPIO#> *
|
| GPIO A |
A |
|
154 |
PAD_SNVS_TAMPER0 |
128
|
| GPIO B |
B |
|
156 |
PAD_SNVS_TAMPER1 |
129
|
| GPIO C |
C |
|
162 |
PAD_SNVS_TAMPER2 |
130
|
| GPIO D |
D |
|
163 |
PAD_SNVS_TAMPER3 |
131
|
| GPIO E |
E |
|
164 |
PAD_SNVS_TAMPER4 |
132
|
| GPIO F |
F |
|
165 |
PAD_SNVS_TAMPER7 |
135
|
| GPIO G |
G |
|
167 |
PAD_SNVS_TAMPER8 |
136
|
| GPIO H |
H |
|
173 |
PAD_SNVS_TAMPER9 |
137
|
| GPIO I |
I |
|
175 |
PAD_UART1_CTS_B |
18
|
| GPIO J |
J |
CIF HSYNC |
74 |
PAD_CSI_HSYNC |
116
|
| GPIO K |
K |
CIF PCLK |
72 |
PAD_CSI_PIXCLK |
114
|
| GPIO L |
L |
CIF MCLK |
70 |
PAD_CSI_MCLK |
113
|
| GPIO M |
M |
CIF VSYNC |
68 |
PAD_CSI_VSYNC |
115
|
| GPIO N |
N |
CIF D9 |
66 |
PAD_CSI_DATA07 |
124
|
| GPIO O |
O |
CIF D8 |
64 |
PAD_CSI_DATA06 |
123
|
| GPIO P |
P |
CIF D7 |
62 |
PAD_CSI_DATA05 |
122
|
| GPIO Q |
Q |
CIF D6 |
60 |
PAD_CSI_DATA04 |
121
|
| GPIO R |
R |
CIF D5 |
58 |
PAD_CSI_DATA03 |
120
|
| GPIO S |
S |
CIF D4 |
56 |
PAD_CSI_DATA02 |
119
|
| GPIO T |
T |
CIF D3 |
54 |
PAD_CSI_DATA01 |
118
|
| GPIO U |
U |
CIF D2 |
52 |
PAD_CSI_DATA00 |
117
|
| GPIO V |
|
CIF D1 |
50 |
<n/a> |
<n/a>
|
| GPIO W |
|
CIF D0 |
48 |
<n/a> |
<n/a>
|
| INT HIGHEST PRIORITY |
INT |
|
151 |
PAD_KEY_COL0 |
11
|
- * = Valid if you didn't change the CONFIG_ARCH_NR_GPIO value in kernel config AND if your kernel doesn't probe another GPIO controller before the imx6 GPIO controller
- Remark: Depending on your board configuration some of the additional gpios shared with the camera interface are not available on your system.
- Controlled by gpiod tools (need Kernel v4.7 or higher)
- Set state
| gpioset $(gpiofind GPIO_LABEL)=0
|
| gpioset $(gpiofind GPIO_LABEL)=1
|
- Get state
| gpioget $(gpiofind GPIO_LABEL)
|
| gpioget $(gpiofind GPIO_LABEL)
|
- Remark: GPIO_LABEL could be A, B, C, ... see table above
- Controlled by sysfs (since Kernel v4.8 deprecated)
- Export
| echo <GPIO#> >/sys/class/gpio/export
|
- Remark: Have a look into /sys/class/gpio/ for already configured gpios.
- Set direction
| echo in >/sys/class/gpio/gpio<GPIO#>/direction
|
| echo out >/sys/class/gpio/gpio<GPIO#>/direction
|
- Set state
| echo 0 >/sys/class/gpio/gpio<GPIO#>/value
|
| echo 1 >/sys/class/gpio/gpio<GPIO#>/value
|
Initialize and Test CAN Interface
- Initialize:
| ip link set can0 up type can bitrate 500000
|
- Send test message via cansend (part of can-utils):
| cansend can0 100#11.2233.44556677.88
|
- Receive can messages (part of can-utils):
- Get can-utils:
| apt-get install can-utils
|
Parallel Address- / Databus
- To use the 16-bit address / databus from Linux userspace you can use the UIO driver interface. To enable and configure the interface it is necessary to setup the WEIM controller with the device tree. See the documentation of the device tree bindings of weim here.
- Here is an example code which demonstrates how to do enable and configure the WEIM interface (parallel address- / databus):
&weim {
	pinctrl-names = "default";
	pinctrl-0 = <&pinctrl_dhcom_weim &pinctrl_dhcom_weim_cs0 &pinctrl_dhcom_weim_cs1>;
	#address-cells = <2>;
	#size-cells = <1>;
	/* it is necessary to setup 2x 64MB otherwise setting gpr fails */
	ranges = <0 0  0x08000000  0x04000000>,					// Chip select 0 == DHCOM CS A
		 <1 0  0x0c000000  0x04000000>;					// Chip select 1 == DHCOM CS B
	fsl,weim-cs-gpr = <&gpr>;
	status = "okay";

	uiomap_cs0@0,0 {
		compatible = "generic-uio";
		reg = <0 0x00000000 0x04000000>;
		reg-names = "uio_cs0";
		interrupt-parent = <&gpio1>;
		interrupts = <2 2>;						// Add gpio A == interrupt
		#address-cells = <1>;
		#size-cells = <1>;
		fsl,weim-cs-timing = <0x00610089 0x00001002 0x0F011061
				      0x00000000 0x0F068A31 0x00000000>;
		status = "okay";
	};

	uiomap_cs1@0,1 {
		compatible = "generic-uio";
		reg = <1 0x00000000 0x04000000>;
		reg-names = "uio_cs1";
		interrupt-parent = <&gpio1>;
		interrupts = <4 2>;						// Add gpio B == interrupt
		#address-cells = <1>;
		#size-cells = <1>;
		fsl,weim-cs-timing = <0x00610089 0x00001002 0x0F011061
				      0x00000000 0x0F068A31 0x00000000>;
		status = "disabled";
	};
};
|
- To use the generic uio driver it has to be enabled in the kernel configuration (
make menuconfig)
- Device Drivers -> Userspace I/O Drivers -> Userspace I/O platform driver with generic IRQ handling
- The device-tree of_id of the uio driver has to be set via kernel command line
- Add "optargs='uio_pdrv_genirq.of_id=generic-uio'" to uLinuxEnv.txt
- Example for a UIO userspace driver:
- Coming soon


