DHCOM How to use the Update Mechanism: Difference between revisions
From Wiki-DB
Jump to navigationJump to search
Jneuhauser (talk | contribs) |
Jneuhauser (talk | contribs) No edit summary |
||
| Line 6: | Line 6: | ||
* DHCOM Update files mostly provided as zip file (If you don't have the needed update files, please ask DH electronics) | * DHCOM Update files mostly provided as zip file (If you don't have the needed update files, please ask DH electronics) | ||
* Windows / Linux computer or virtual machine with a administrative account | * Windows / Linux computer or virtual machine with a administrative account | ||
* USB stick with at least 1 GB capacity | * Empty USB stick with at least 1 GB capacity | ||
* DHCOM i.MX6 / i.MX25 / AM335x / AM35xx | * DHCOM i.MX6 / i.MX25 / AM335x / AM35xx | ||
* Baseboard with USB port like [https://www.dh-electronics.com/produkte/dhsom-system-on-modules/dh-pdk2 PDK2] / [https://www.dh-electronics.com/produkte/dhsom-system-on-modules/dh-picoitx2 picoITX2] / [https://www.dh-electronics.com/produkte/dhcon-controls-connectivity/dhcon-drc02 DRC02] | * Baseboard with USB port like [https://www.dh-electronics.com/produkte/dhsom-system-on-modules/dh-pdk2 PDK2] / [https://www.dh-electronics.com/produkte/dhsom-system-on-modules/dh-picoitx2 picoITX2] / [https://www.dh-electronics.com/produkte/dhcon-controls-connectivity/dhcon-drc02 DRC02] | ||
| Line 16: | Line 16: | ||
Make the USB stick available in your system by connecting it to your computer. If you work with a virtual machine, then connect the newly connected USB stick to your virtual machine. | Make the USB stick available in your system by connecting it to your computer. If you work with a virtual machine, then connect the newly connected USB stick to your virtual machine. | ||
== Linux == | == Linux (Debian) == | ||
This step by step guide has been developed and tested with the [[Virtual Machine for Application Development]] from DH electronics and should also work on other linux distros. | This step by step guide has been developed and tested with the [[Virtual Machine for Application Development]] from DH electronics and should also work with gparted on other linux distros. | ||
=== Prepare for the next steps === | === Prepare for the next steps === | ||
* Open | * Open the disk utility '''GParted''' | ||
: <span style="color: gray;">Note: You will be asked for your user password to gain super user right through sudo.</span> | |||
* | * Choose your device in the drop down menu right at the top of the user interface | ||
:[[File: | :[[File:Gparted_select_device.JPG|470px]] | ||
: | : <span style="color: red;">Note: Be sure that you have selected the correct device. The following steps force a loss of data on the selected device!</span> | ||
=== Check current partition table and partition format === | === Check current partition table and partition format === | ||
* | * Verify that you already have a DOS partition table and that the first partition is formatted as FAT32 by selecting Device Information in the View menu | ||
:[[File: | :[[File:Gparted_show_device_info.JPG|470px]] | ||
* If you see <span style="color: red;"> | * If you see <span style="color: red;">Partition table: msdos</span> and <span style="color: red;">File System: fat32</span> your USB stick is already prepared for the Update Mechanism and you can head over to [[#Place Update Files on the USB stick]] | ||
=== Create DOS partition table and FAT32 partition === | === Create DOS partition table and FAT32 partition === | ||
Revision as of 06:57, 23 October 2019
This guide describes how to properly update the built-in flash or eMMC memory on DHCOM devices with a provided update zip file.
Required hard- and software
- DHCOM Update files mostly provided as zip file (If you don't have the needed update files, please ask DH electronics)
- Windows / Linux computer or virtual machine with a administrative account
- Empty USB stick with at least 1 GB capacity
- DHCOM i.MX6 / i.MX25 / AM335x / AM35xx
- Baseboard with USB port like PDK2 / picoITX2 / DRC02
Prepare a USB stick or SD card for the update process
The bootloader update mechanism expects a single FAT32 partition on a storage device such as a USB stick or SD card.
Make the USB stick available in your system by connecting it to your computer. If you work with a virtual machine, then connect the newly connected USB stick to your virtual machine.
Linux (Debian)
This step by step guide has been developed and tested with the Virtual Machine for Application Development from DH electronics and should also work with gparted on other linux distros.
Prepare for the next steps
- Open the disk utility GParted
- Note: You will be asked for your user password to gain super user right through sudo.
- Choose your device in the drop down menu right at the top of the user interface
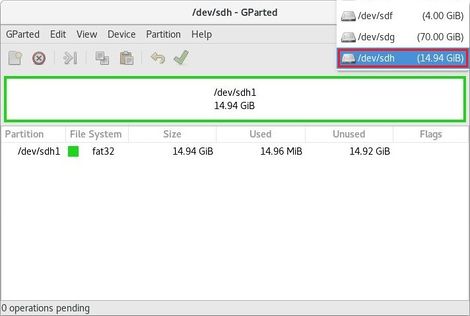
- Note: Be sure that you have selected the correct device. The following steps force a loss of data on the selected device!

Check current partition table and partition format
- Verify that you already have a DOS partition table and that the first partition is formatted as FAT32 by selecting Device Information in the View menu

- If you see Partition table: msdos and File System: fat32 your USB stick is already prepared for the Update Mechanism and you can head over to #Place Update Files on the USB stick
Create DOS partition table and FAT32 partition
- Create empty dos partition table and one full size primary partition with
fdisk /dev/sdX
- Note: As fdisk is a interactive utility, you have to enter the red printed commands manually.
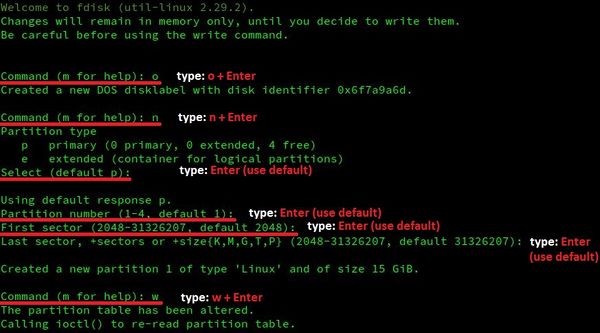
- Note: If you see a question like "Do you want to remove the signature?", it does not matter if you answer with yes or no.

- Format the new partition with
mkfs.vfat /dev/sdX1