DHCOM How to use the Update Mechanism: Difference between revisions
Jneuhauser (talk | contribs) No edit summary |
Jneuhauser (talk | contribs) No edit summary |
||
| Line 21: | Line 21: | ||
=== Open GParted and select device === | === Open GParted and select device === | ||
* Open the disk utility '''GParted''' | * Open the disk utility '''GParted'''. | ||
: <span style="color: gray;">Note: You will be asked for your user password to gain super user right through sudo.</span> | : <span style="color: gray;">Note: You will be asked for your user password to gain super user right through sudo.</span> | ||
* Choose your device in the drop down menu right at the top of the user interface | * Choose your device in the drop down menu right at the top of the user interface. | ||
:[[File:Gparted_select_device.JPG|500px]] | :[[File:Gparted_select_device.JPG|500px]] | ||
: <span style="color: red;">Warning: Be sure that you have selected the correct device for the following steps.</span> | : <span style="color: red;">Warning: Be sure that you have selected the correct device for the following steps.</span> | ||
| Line 30: | Line 30: | ||
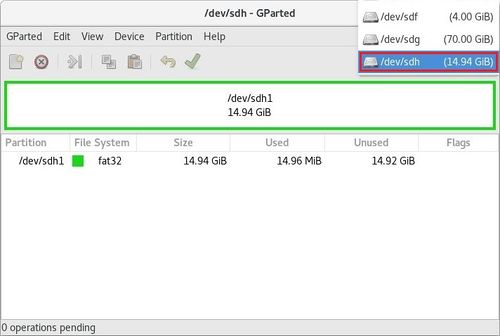
* Verify that you already have a DOS partition table and that the first partition is formatted as FAT32 by selecting '''''Device Information''''' in the '''''View''''' menu | * Verify that you already have a DOS partition table and that the first partition is formatted as FAT32 by selecting '''''Device Information''''' in the '''''View''''' menu | ||
:[[File:Gparted_show_device_info.JPG|500px]] | :[[File:Gparted_show_device_info.JPG|500px]] | ||
* If you see <span style="color: orange;">Partition table: msdos</span> and <span style="color: orange;">File System: fat32</span> your USB stick is already prepared for the Update Mechanism and you can head over to [[#Place Update Files on the USB stick]] | * If you see <span style="color: orange;">Partition table: msdos</span> and <span style="color: orange;">File System: fat32</span> your USB stick is already prepared for the Update Mechanism and you can head over to [[#Place Update Files on the USB stick]]. | ||
* If you only see <span style="color: orange;">Partition table: msdos</span> head over to [[#Create FAT32 formatted partition]] | * If you only see <span style="color: orange;">Partition table: msdos</span> head over to [[#Create FAT32 formatted partition]]. | ||
* And if you don´t see anything like in the picture follow the next steps | * And if you don´t see anything like in the picture follow the next steps. | ||
=== Create DOS partition table === | === Create DOS partition table === | ||
| Line 41: | Line 41: | ||
=== Create FAT32 formatted partition === | === Create FAT32 formatted partition === | ||
<span style="color: red;">Warning: The following steps will cause data loss on the selected device!</span> | <span style="color: red;">Warning: The following steps will cause data loss on the selected device!</span> | ||
* Remove any existing partition by selecting them and choosing '''''Delete''''' in '''''Partition''''' menu | * Remove any existing partition by selecting them and choosing '''''Delete''''' in '''''Partition''''' menu. | ||
* Create a FAT32 formatted partition with '''''New''''' in the '''''Partition''''' menu and ensure you select <span style="color: orange;">File system: fat32</span>. | * Create a FAT32 formatted partition with '''''New''''' in the '''''Partition''''' menu and ensure you select <span style="color: orange;">File system: fat32</span>. | ||
:[[File:Gparted_create_partition.JPG|500px]] | :[[File:Gparted_create_partition.JPG|500px]] | ||
* Apply all operations to write changes to disk | * Apply all operations to write changes to disk. | ||
:[[File:Gparted_apply_operations.JPG|500px]] | :[[File:Gparted_apply_operations.JPG|500px]] | ||
| Line 58: | Line 58: | ||
=== Check current partition table and partition format === | === Check current partition table and partition format === | ||
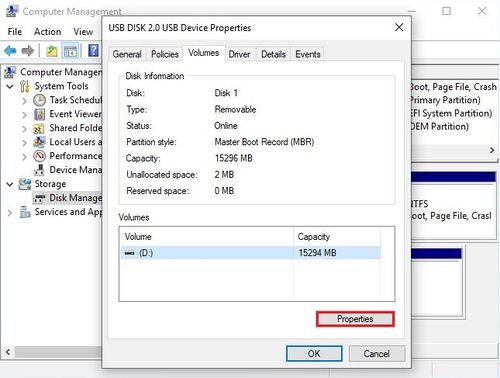
* Open the dialog '''''Properties''''' with a right-click on the device | * Open the dialog '''''Properties''''' with a right-click on the device. | ||
:[[File:Windows_disk_mgmt_check_properties.JPG|500px]] | :[[File:Windows_disk_mgmt_check_properties.JPG|500px]] | ||
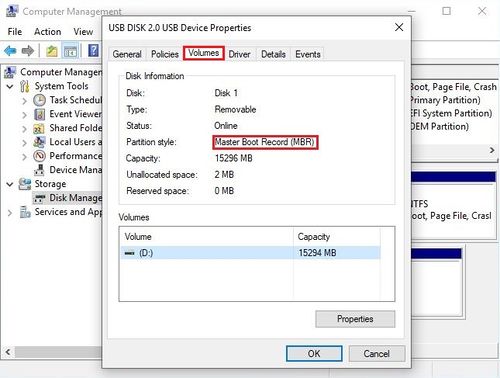
* Check for <span style="color: orange;">Partition style: Master Boot Record (MBR)</span> in the '''''Volumes''''' tab | * Check for <span style="color: orange;">Partition style: Master Boot Record (MBR)</span> in the '''''Volumes''''' tab. | ||
:[[File:Windows_disk_mgmt_check_partition_type.JPG|500px]] | :[[File:Windows_disk_mgmt_check_partition_type.JPG|500px]] | ||
: If you don´t see <span style="color: orange;">Partition style: Master Boot Record (MBR)</span> follow [https://docs.microsoft.com/en-us/windows-server/storage/disk-management/change-a-gpt-disk-into-an-mbr-disk#converting-using-a-command-line Convert to MBR using a command line] and continue with [[#Create FAT32 partition]] afterwards | : If you don´t see <span style="color: orange;">Partition style: Master Boot Record (MBR)</span> follow [https://docs.microsoft.com/en-us/windows-server/storage/disk-management/change-a-gpt-disk-into-an-mbr-disk#converting-using-a-command-line Convert to MBR using a command line] and continue with [[#Create FAT32 partition]] afterwards. | ||
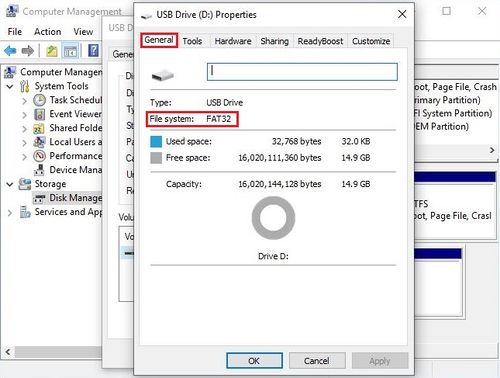
* Check for <span style="color: orange;">File system: FAT32</span> in the '''''General''''' tab of the '''''Properties''''' windows of the '''''Volume''''' | * Check for <span style="color: orange;">File system: FAT32</span> in the '''''General''''' tab of the '''''Properties''''' windows of the '''''Volume'''''. | ||
:[[File:Windows_disk_mgmt_partition_properties.JPG|500px]] | :[[File:Windows_disk_mgmt_partition_properties.JPG|500px]] | ||
:[[File:Windows_disk_mgmt_check_format_type.JPG|500px]] | :[[File:Windows_disk_mgmt_check_format_type.JPG|500px]] | ||
: If you don´t see <span style="color: orange;">File system: FAT32</span> continue at [[#Remove existing partitions]] | : If you don´t see <span style="color: orange;">File system: FAT32</span> continue at [[#Remove existing partitions]]. | ||
* Congratulations your USB stick is already prepared for the Update Mechanism and you can head over to [[#Place Update Files on the USB stick]] | * Congratulations your USB stick is already prepared for the Update Mechanism and you can head over to [[#Place Update Files on the USB stick]]. | ||
=== Remove existing partitions === | === Remove existing partitions === | ||
<span style="color: red;">Warning: The following steps will cause data loss on the selected device!</span> | <span style="color: red;">Warning: The following steps will cause data loss on the selected device!</span> | ||
* | * Select '''''Delete Volume''''' in the right-click menu to delete the existing partition on the device. | ||
:[[File:Windows_disk_mgmt_delete_partition.JPG|500px]] | :[[File:Windows_disk_mgmt_delete_partition.JPG|500px]] | ||
=== Create FAT32 partition === | === Create FAT32 partition === | ||
<span style="color: red;">Warning: The following steps will cause data loss on the selected device!</span> | <span style="color: red;">Warning: The following steps will cause data loss on the selected device!</span> | ||
* Create a | * Create a new partition with '''''New Simple Partition''''' in the right-click menu of the unallocated space. | ||
:[[File:Windows_disk_mgmt_new_partition.JPG|500px]] | :[[File:Windows_disk_mgmt_new_partition.JPG|500px]] | ||
* Use all defaults in the wizard, except in the Format Partition step, choose <span style="color: orange;">File system: FAT32</span>. | |||
:[[File:Windows_disk_mgmt_fat32_partition.JPG|500px]] | :[[File:Windows_disk_mgmt_fat32_partition.JPG|500px]] | ||
= Place Update Files on the USB stick = | = Place Update Files on the USB stick = | ||
Revision as of 14:17, 23 October 2019
This guide describes how to properly update the built-in flash or eMMC memory on DHCOM devices with a provided update zip file.
Required hard- and software
- DHCOM Update files mostly provided as zip file (If you don't have the needed update files, please ask DH electronics)
- Windows / Linux computer or virtual machine with a administrative account
- Empty USB stick with at least 1 GB capacity
- DHCOM i.MX6 / i.MX25 / AM335x / AM35xx
- Baseboard with USB port like PDK2 / picoITX2 / DRC02
Prepare a USB stick or SD card for the update process
The bootloader update mechanism expects a single FAT32 partition on a storage device such as a USB stick or SD card.
Make the USB stick available in your system by connecting it to your computer. If you work with a virtual machine, then connect the newly connected USB stick to your virtual machine.
Linux
This step by step guide has been developed and tested with the Virtual Machine for Application Development from DH electronics and should also work with gparted on other linux distros.
Open GParted and select device
- Open the disk utility GParted.
- Note: You will be asked for your user password to gain super user right through sudo.
- Choose your device in the drop down menu right at the top of the user interface.
- Warning: Be sure that you have selected the correct device for the following steps.

Check current partition table and partition format
- Verify that you already have a DOS partition table and that the first partition is formatted as FAT32 by selecting Device Information in the View menu

- If you see Partition table: msdos and File System: fat32 your USB stick is already prepared for the Update Mechanism and you can head over to #Place Update Files on the USB stick.
- If you only see Partition table: msdos head over to #Create FAT32 formatted partition.
- And if you don´t see anything like in the picture follow the next steps.
Create DOS partition table
Warning: The following steps will cause data loss on the selected device!
- Create a empty dos partition table with Create Partition Table in the Device menu and ensure you select msdos as type.

Create FAT32 formatted partition
Warning: The following steps will cause data loss on the selected device!
- Remove any existing partition by selecting them and choosing Delete in Partition menu.
- Create a FAT32 formatted partition with New in the Partition menu and ensure you select File system: fat32.

- Apply all operations to write changes to disk.

Windows
This step by step guide has been developed and tested with Windows 10 Professional Version 1809 and should also work with Windows 7/8 and similar.
Open Disk Management
- Press the Windows button, type compmgmt.msc and start the Microsoft Service Console as administrator by Run as administrator in the right-click menu.

- In the tree view on the left side of the window, select Disk Management in the section Storage.

Check current partition table and partition format
- Open the dialog Properties with a right-click on the device.

- Check for Partition style: Master Boot Record (MBR) in the Volumes tab.
- If you don´t see Partition style: Master Boot Record (MBR) follow Convert to MBR using a command line and continue with #Create FAT32 partition afterwards.

- Check for File system: FAT32 in the General tab of the Properties windows of the Volume.
- If you don´t see File system: FAT32 continue at #Remove existing partitions.


- Congratulations your USB stick is already prepared for the Update Mechanism and you can head over to #Place Update Files on the USB stick.
Remove existing partitions
Warning: The following steps will cause data loss on the selected device!
- Select Delete Volume in the right-click menu to delete the existing partition on the device.

Create FAT32 partition
Warning: The following steps will cause data loss on the selected device!
- Create a new partition with New Simple Partition in the right-click menu of the unallocated space.

- Use all defaults in the wizard, except in the Format Partition step, choose File system: FAT32.
