Using Yocto/ELBE SDK for application development
This site is under construction!
Root filesystems made by Yocto and ELBE can each come with a SDK to build applications for the rootFS.
Installation
The following packages are required for the installation of the SDK:
- xz-utils
- file
- patchelf
Run the setup-script (e.g. setup-elbe-sdk-arm-linux-gnueabihf-dhcom-buster-1.0.sh) as root to start the installation.
Using the SDK
The main structure between the SDKs of Yocto and ELBE is very similar, these consist of two parts:
- A folder "sysroots" with two subfolders:
- In one of the folders are the programms for the development host for using the SDK (e.g. compiler, debugger, ...). In Yocto this folder has the name of the development host archictecture and "sdk" in it. In ELBE this folder is usually called "host".
- The second folder contains headers and libraries needed by the linker to build applications for the rootFS. In Yocto this folder has the name of the target archictecture in it. In ELBE this folder is usually called "target".
- A file with environment variables to setup the build environment (sourcing this file sets variables like ${CC} or ${LD}). The name of the file usually starts with "environment-setup-"
The default installation folder varies between the two tools: Both do install into "/opt/" but Yocto uses two subfolders (one for the distribution name, the other for the version), while ELBE uses only one subfolder.
Following are instructions how to use the SDK with different build-systems and IDEs (All examples using an ELBE toolchain installed at "/opt/elbe-sdk-arm-linux-gnueabihf-dhcom-buster-1.0"):
Makefiles
Open a shell and source the file with the environment variables:
user@machine:/<projectdir># source /opt/elbe-sdk-arm-linux-gnueabi-dhcom-buster-1.0/environment-setup-elbe-arm-linux-gnueabihf-dhcom-buster-1.0
Now you can use make to build applications in this shell session.
user@machine:/<projectdir># make
If you want to use another toolchain, you have to start a new shell session.
Important: Do not overwrite variables which were set by SDK in the makefile (or call make with '-e' to discard variables set in the makefile).
CMake
Setting up CMake to use the toolchain in the SDK is not much different than makefiles:
At first source the file with the environment variables inside a shell:
user@machine:/<projectdir># source /opt/elbe-sdk-arm-linux-gnueabi-dhcom-buster-1.0/environment-setup-elbe-arm-linux-gnueabihf-dhcom-buster-1.0
Now, for the remainder of this shell session, you can use CMake with this SDK:
user@machine:/<projectdir># cd build
user@machine:/<projectdir>/build# cmake ..
user@machine:/<projectdir>/build# cd ..
user@machine:/<projectdir># cmake --build build
If you want to use another toolchain, you have to start a new shell session.
Qt-Creator
Start Qt Creator.
Now open the "Options"-window (Tools -> Options).
In the section "Build & Run" add in the "Compilers"-tab new compilers for C and C++ (Add -> GCC --> C / C++). Set the compiler path to the fitting executable in "/opt/elbe-sdk-arm-linux-gnueabihf-dhcom-buster-1.0/sysroots/host/usr/bin/".
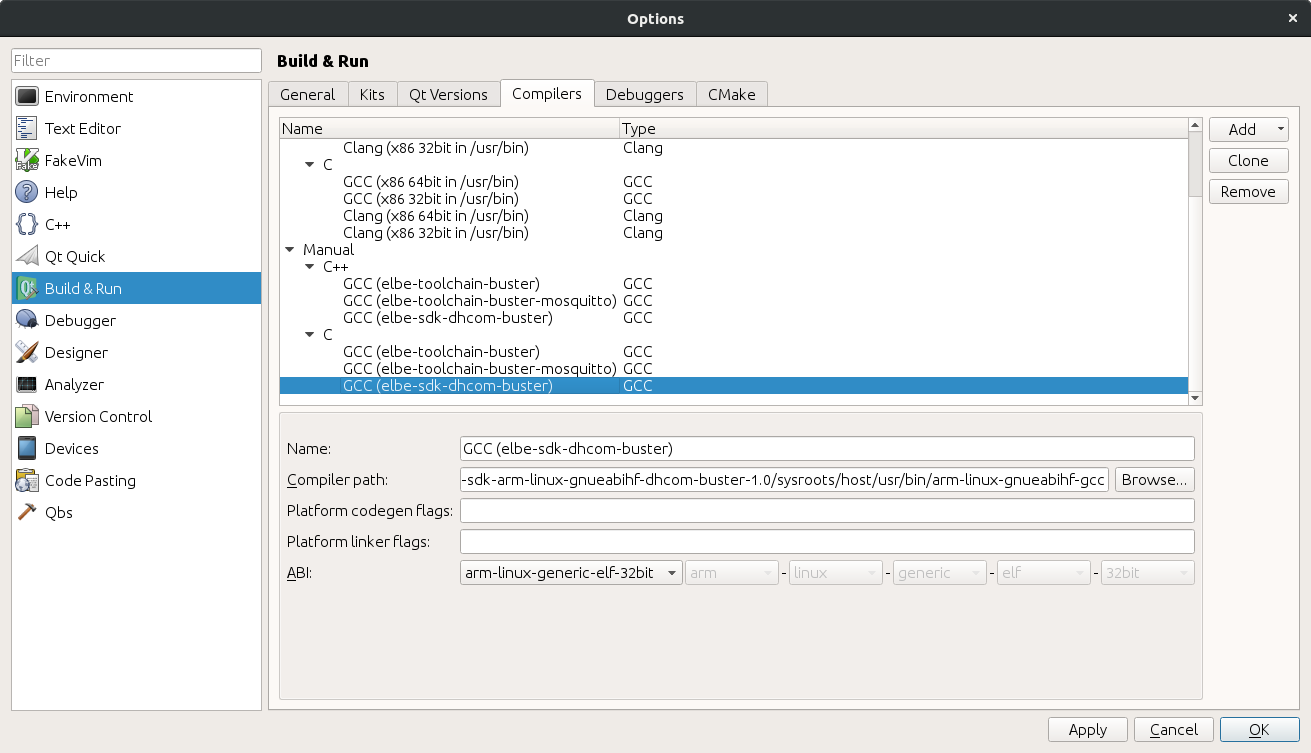
If the toolchain in the SDK includes Qt, switch to the "Qt Versions"-tab and add the qmake executable of the toolchain (usually in "/opt/elbe-sdk-arm-linux-gnueabihf-dhcom-buster-1.0/sysroots/host/usr/bin/qt5/qmake").
For the debugger, change to the "Debuggers"-tab and add the gdb-multiarch executable of the toolchain (usually in "/opt/elbe-sdk-arm-linux-gnueabihf-dhcom-buster-1.0/sysroots/host/usr/bin/gdb-multiarch").
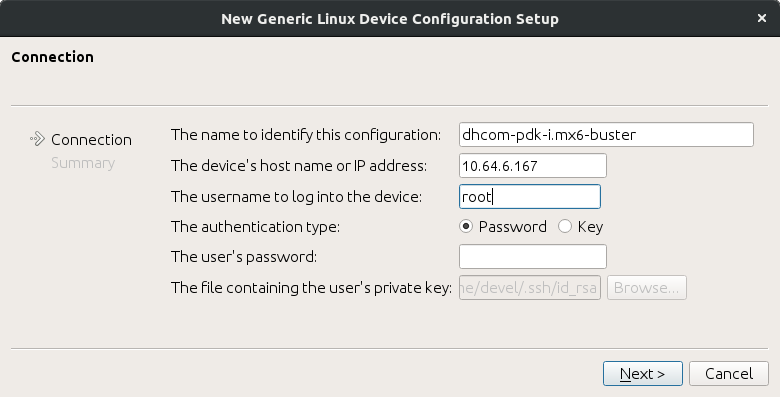
If you want to deploy built software directly onto the embedded device, then change to the section "Devices" and add a new device. Select "Generic Linux Device" and set the IP-address, username and password.
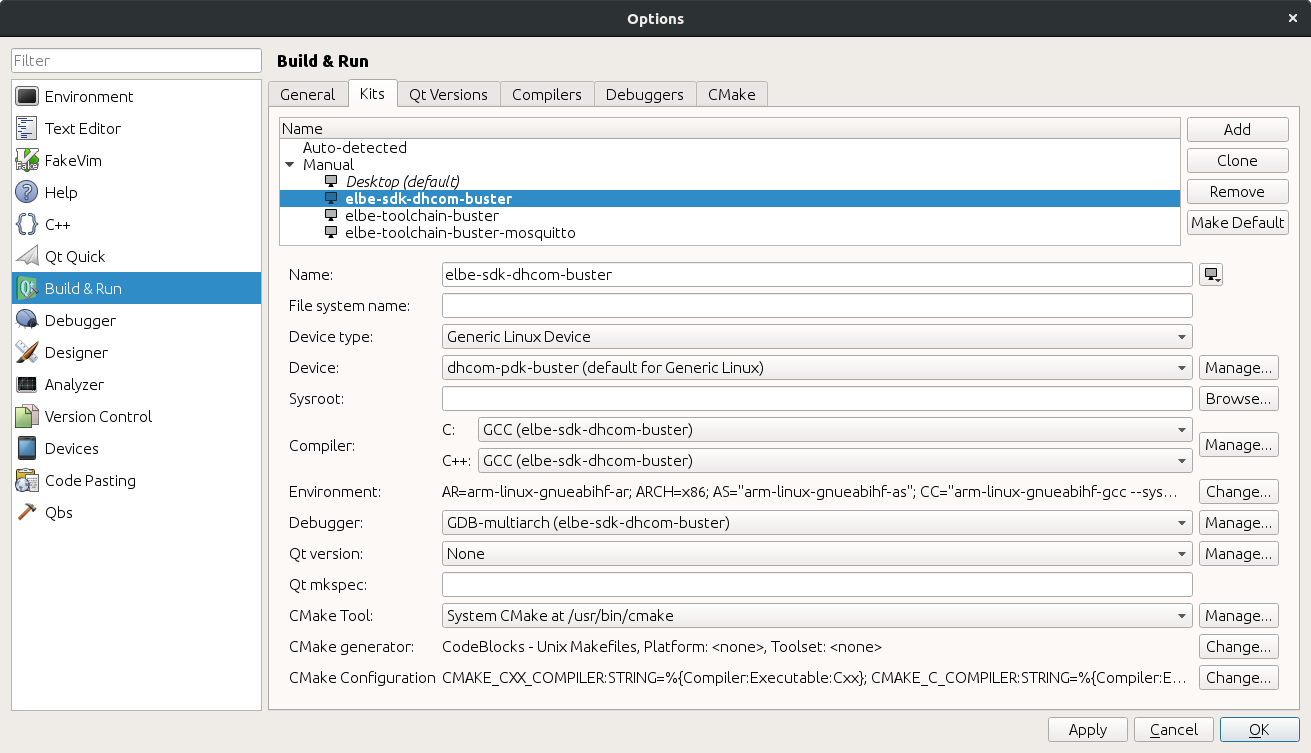
Now change back to the section "Build & Run". In the tab "Kits" you have to add a new Kit for the toolchain. Set the compilers, debuggers, Qt and the device to these, which you have defined at the preceding steps. If the SDK does not include Qt you have to set Qt to "None" (like in the example).
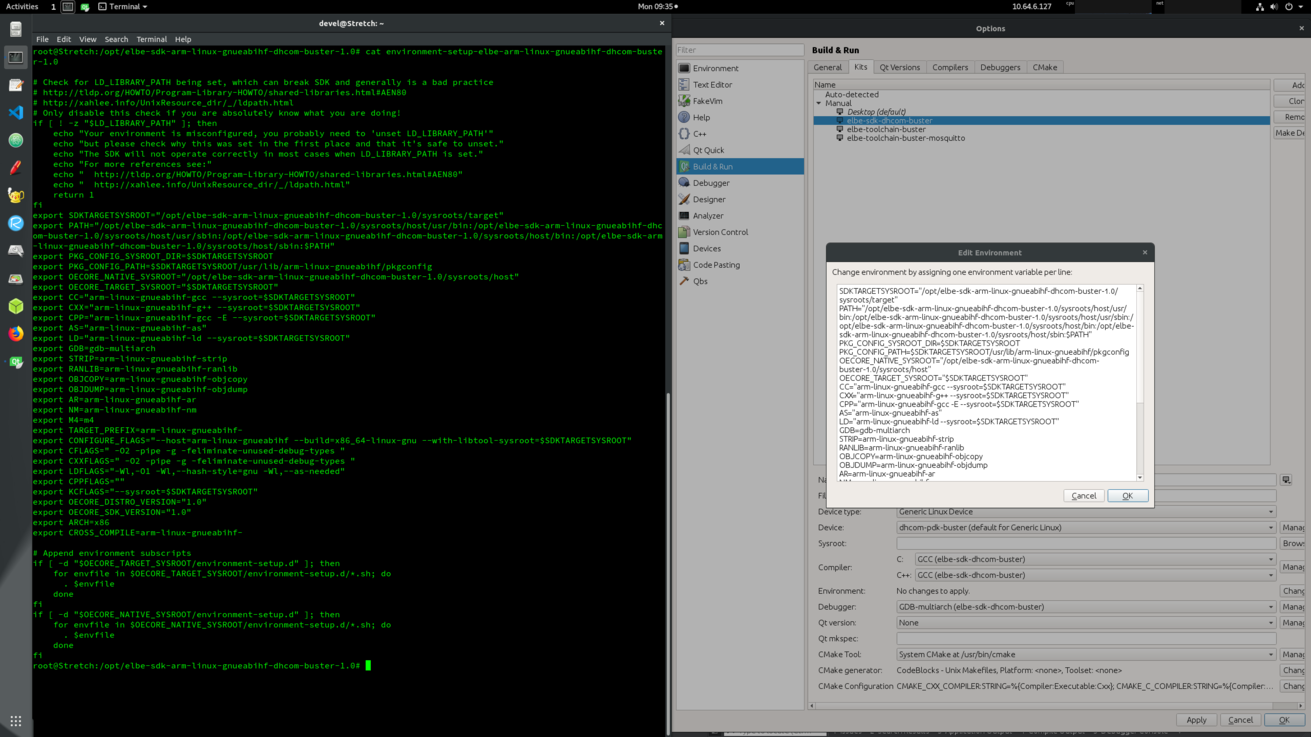
Now you have to define the environment. Set the environment for the kit according to the environment setup file (but remove the "export" statements). If there are files inside the folders "/opt/elbe-sdk-arm-linux-gnueabihf-dhcom-buster-1.0/sysroots/host/environment-setup.d/" or "/opt/elbe-sdk-arm-linux-gnueabihf-dhcom-buster-1.0/sysroots/target/environment-setup.d/", any environment variables which are set in those have also be included.
Now any project in Qt Creator can use the toolchain of the SDK if the kit is selected for the project. If you want to use another SDK-toolchain, you can switch the used kit for the project.
Eclipse
To use Eclipse with the SDK you have to start a shell and source the environment setup file and then open eclipse through that shell (note that Eclipse has to be in your PATH, when starting it like in the example):
user@machine:~# source /opt/elbe-sdk-arm-linux-gnueabi-dhcom-buster-1.0/environment-setup-elbe-arm-linux-gnueabihf-dhcom-buster-1.0
user@machine:~# eclipse
When creating a new Eclipse project, use "Linux GCC" as the toolchain, the additional settings when selecting "Cross GCC" are conflicting with the environment of the SDK.
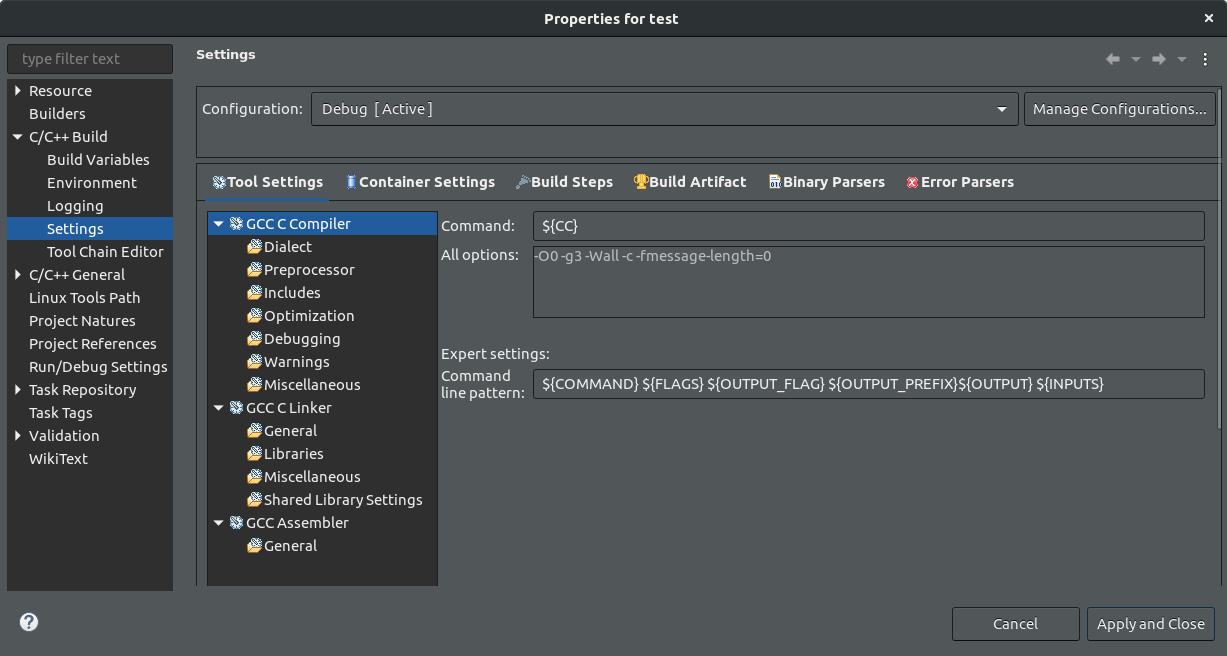
After creating the project open the project settings and go to the section "C/C++ Build -> Settings". Now go to "GCC C Compiler" and set the "Command" to "${CC}".
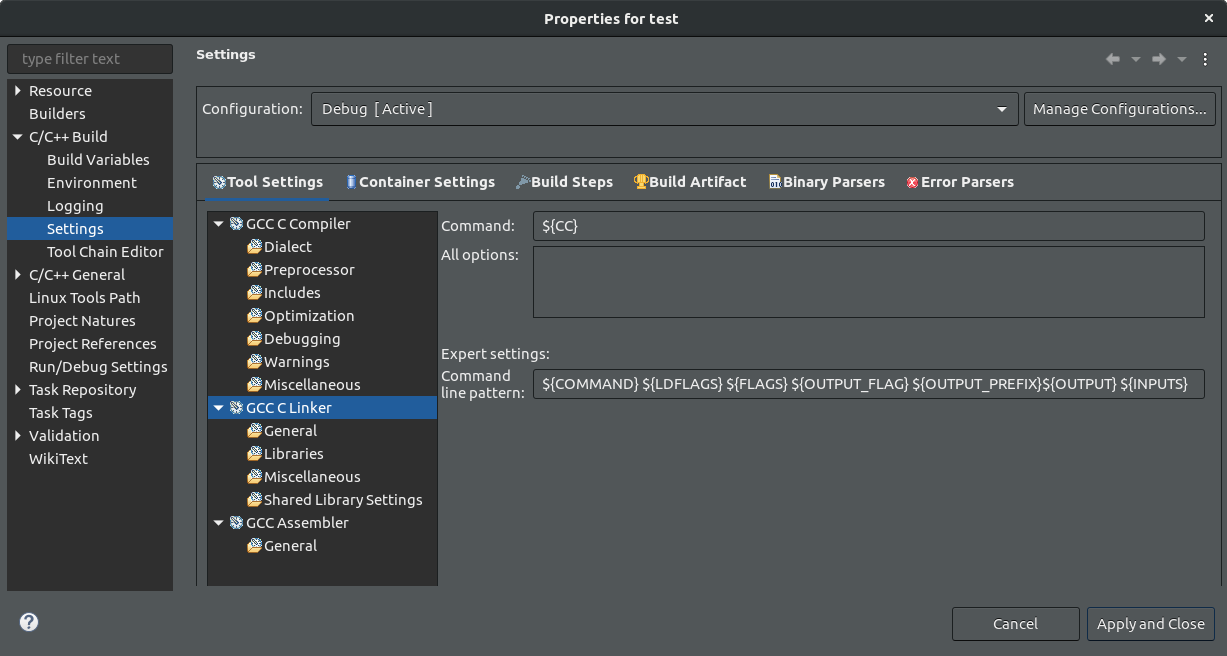
Now go to "GCC C Linker", change the "Command" to "${CC}" and add at "Command line pattern" between "${COMMAND}" and "${FLAGS}" "${LDFLAGS}"
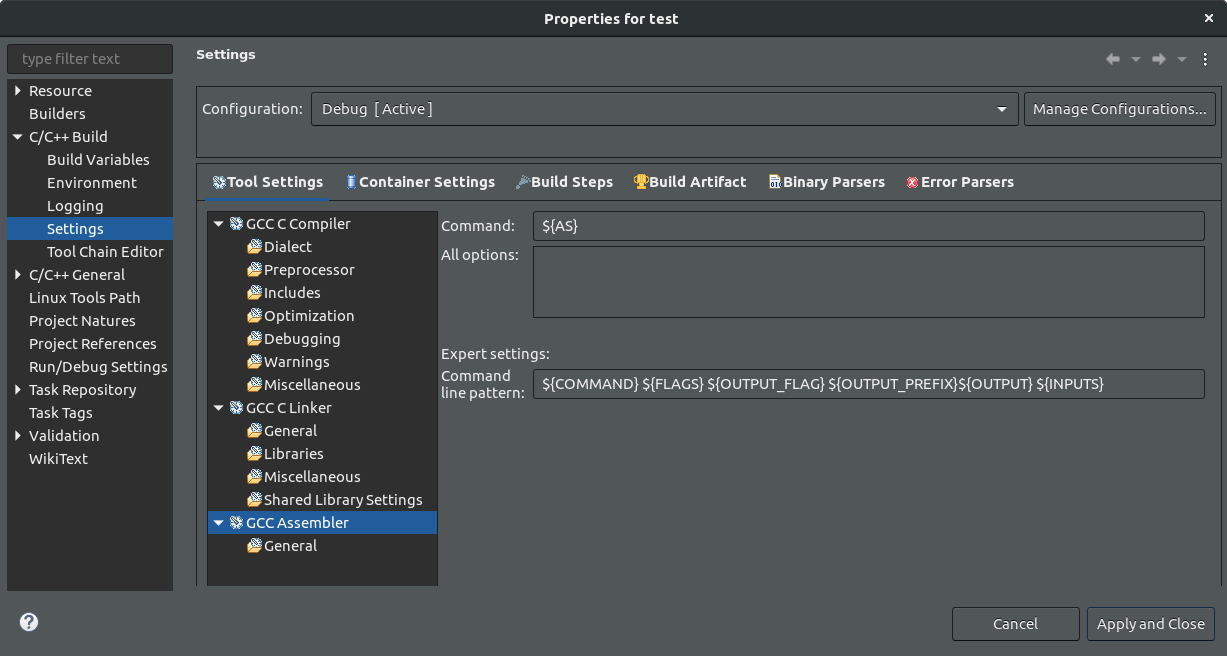
Now go to "GCC Assembler" and change the "Command" to "${AS}".
The toolchain of the SDK con now be used by Eclipse as long Eclipse is not closed. If you want to use a toolchain of another SDK you have to close Eclipse and source the environment setup of the other SDK and start Eclipse from that shell.
Visual Studio Code
If you want to develop in C/C++ you have to install the extension "C/C++" inside Visual Studio Code.
To use Visual Studio Code with the SDK you have to start a shell and source the environment setup file and then open Visual Studio Code through that shell:
user@machine:~# source /opt/elbe-sdk-arm-linux-gnueabi-dhcom-buster-1.0/environment-setup-elbe-arm-linux-gnueabihf-dhcom-buster-1.0
user@machine:~# code
Open a folder as workspace where you have your code.
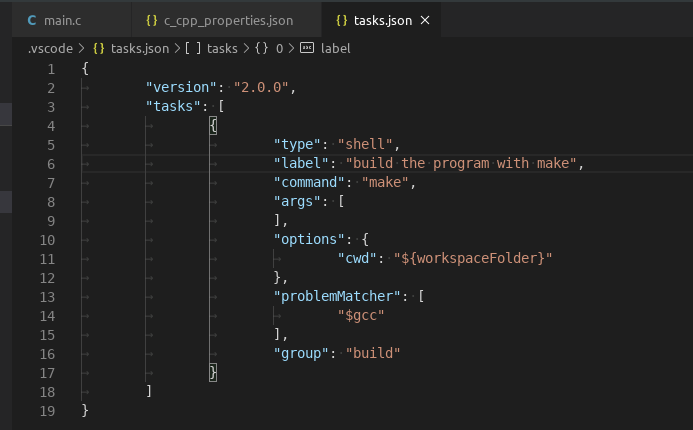
When you want to build your program select "Terminal -> Configure Default Build Task" and choose your appropiate action with gcc. The file "tasks.json" is now generated. After that change the command to the appropiate command (e.g. to "${CC}" if you want to directly use the compiler of the toolchain, or if you use a makefile change it to "make").
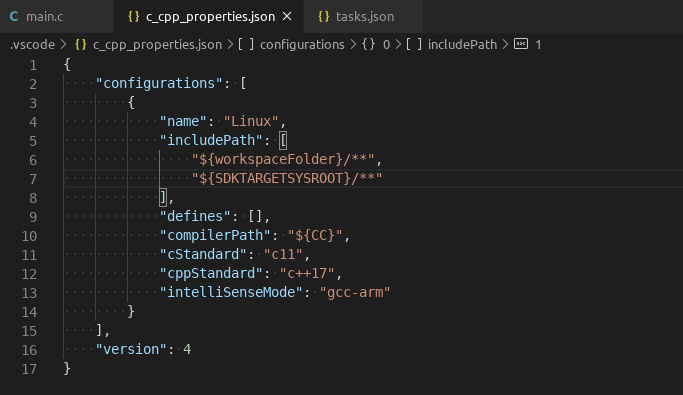
To configure Intellisense for syntax highlighting and finding the headers of libraries, press CTRL + SHIFT + P and select "C/C++: Edit Configurations (JSON)". The file "c_cpp_properties.json" is now generated for this workspace. Here add "${SDKTARGETSYSROOT}/**" to the includePath, set the compilerPath to "${CC}" and set the intelliSenseMode to "gcc-arm". Now save the file and reload the workspace, then Intellisense should find the headers of the SDK.
To run the build, you have to select "Terminal -> Run Build Task" from the menu.
External Links
- Yocto SDK documentation
- Blog on configuring Qt Creator for Yocto SDK
- How-to for using the Yocto SDK with Eclipse - NOTE: The Yocto plugin for Eclipse mentioned at this site is no longer maintained (in 2020) and is not available on recent versions of Eclipse!

