COM iMX6 Bootloader U-Boot: Difference between revisions
| (4 intermediate revisions by the same user not shown) | |||
| Line 12: | Line 12: | ||
== Downloads == | == Downloads == | ||
Please have a look at the[[ | Please have a look at the[[DHCOM iMX6-D2#Download binaries/images| i.MX6 Download binaries/images]] section. | ||
== Enter Bootloader Console == | == Enter Bootloader Console == | ||
| Line 569: | Line 569: | ||
:The DHCOM settings are used to setup display and special hardware parameters. For detailed description please have a look at [[DHCOM Settings|'''How to create a settings.bin file''']]. | :The DHCOM settings are used to setup display and special hardware parameters. For detailed description please have a look at [[DHCOM Settings|'''How to create a settings.bin file''']]. | ||
:The DHCOM settings file and the splash bitmap are loaded via the env variables "'''load_settings_bin'''" and "'''load_splash'''" during startup from boot partition. The default content of these env variables is: | :The DHCOM settings file and the splash bitmap are loaded via the env variables "'''load_settings_bin'''" and "'''load_splash'''" during startup from boot partition. The default content of these env variables is: | ||
settings_bin_file= | settings_bin_file=settings.bin | ||
splash_file=splash.bmp | splash_file=splash.bmp | ||
load_settings_bin=load mmc ${mmcdev}:${mmcpart} ${loadaddr} ${settings_bin_file} | load_settings_bin=load mmc ${mmcdev}:${mmcpart} ${loadaddr} ${settings_bin_file} | ||
| Line 613: | Line 613: | ||
== Building U-Boot == | == Building U-Boot == | ||
=== Prepare Build Environment === | === Prepare Build Environment === | ||
{| class="wikitable" style="width: 100%; color: #000000; background: #ffffff;" | | |||
| | |||
1. Download and start the [[Virtual Machine for Application Development]] | |||
|} | |||
=== Get Sources === | |||
{| class="wikitable" style="width: 100%; color: #000000; background: #ffffff;" | | |||
| | |||
2. Start a terminal on Linux<br/> | |||
3. <tt># ''git clone [https://github.com/dh-electronics/u-boot-imx6qdl.git https://github.com/dh-electronics/u-boot-imx6qdl.git]''</tt><br/> | |||
4. <tt># ''cd u-boot-imx6qdl''</tt><br/> | |||
5. <tt># ''git checkout dev/legacy/2018.05_dhcom''</tt> | |||
|} | |||
=== Start Build=== | |||
{| class="wikitable" style="width: 100%; color: #000000; background: #ffffff;" | | |||
| | |||
6. <tt># ''make ARCH=arm CROSS_COMPILE=/opt/gcc-linaro-6.3.1-2017.05-x86_64_arm-linux-gnueabihf/bin/arm-linux-gnueabihf- dh_imx6_defconfig''</tt><br/> | |||
7. <tt># ''make ARCH=arm CROSS_COMPILE=/opt/gcc-linaro-6.3.1-2017.05-x86_64_arm-linux-gnueabihf/bin/arm-linux-gnueabihf- all''</tt> | |||
|} | |||
Your new <tt>u-boot-with-spl.imx</tt> file is available in <tt>u-boot-imx6qdl/</tt> | |||
== Building U-Boot (based on v2015.10) == | |||
=== Prepare Build Environment === | |||
{| class="wikitable" style="width: 100%; color: #000000; background: #ffffff;" | | |||
| | |||
1. Download and start the [[Virtual Machine for Application Development]] | |||
|} | |||
=== Get Sources === | === Get Sources === | ||
{| class="wikitable" style="width: 100%; color: #000000; background: #ffffff;" | | {| class="wikitable" style="width: 100%; color: #000000; background: #ffffff;" | | ||
| | | | ||
2. Start a terminal on Linux<br/> | |||
3. <tt># ''git clone [https://github.com/dh-electronics/u-boot-imx6qdl.git https://github.com/dh-electronics/u-boot-imx6qdl.git]''</tt><br/> | |||
4. <tt># ''cd u-boot-imx6qdl''</tt><br/> | |||
5. <tt># ''git checkout dev/2015.10_dhcom''</tt> | |||
|} | |} | ||
=== Start Build=== | === Start Build=== | ||
{| class="wikitable" style="width: 100%; color: #000000; background: #ffffff;" | | {| class="wikitable" style="width: 100%; color: #000000; background: #ffffff;" | | ||
| Line 629: | Line 657: | ||
|} | |} | ||
* Your new <tt>u-boot.imx</tt> file is available in <tt>u-boot-imx6qdl/</tt> | * Your new <tt>u-boot.imx</tt> file is available in <tt>u-boot-imx6qdl/</tt> | ||
* If your build does fail please check content of uboot_make and adjust PATH. | * If your build does fail please check content of uboot_make and adjust PATH. | ||
Latest revision as of 08:07, 11 May 2020
FAQ
- Q: U-Boot doesn't start anymore?
- A: See U-Boot recovery for i.MX6_Q/D/DL/S/ULL via JTAG
- Q: Initialization of MAC address in the bootloader?
- A: At the first start, the bootloader reads the MAC address from the EEPROM and creates env variable ethaddr. The env variable ethaddr could be changed during lifetime to any other MAC address. If you like to get back the original MAC address, please remove ethaddr, save environment and restart the system. In addition to that the env variable ethaddr would be initialized again with eeprom MAC address.
- Q: The automatic update is not executed before the operating system boots!
- A: Check if the command
update autois included in the bootloader environment variablebootcmdor in a script-variable which is called withinbootcmdbeforebootm.
- Q: The automatic update does not work with my desired update-media!
- A: The command
update autocan be configured with flags within the DHCOM settings.bin block. It is possible to disable a interface for the update mechanism. You can run a update from a disabled interface if you use the commandupdatewithout the argumentauto.
Downloads
Please have a look at the i.MX6 Download binaries/images section.
Enter Bootloader Console
- Connect DHCOM UART1 via null modem cable to the RS232 Port of your PC
- Start terminal program (e.g. Tera Term) on the Host PC with the following settings:
- Baud rate: 115200
- Data: 8 bit
- Parity: none
- Stop bits: 1 bit
- Flow control: none
- Press "DEL" on the Host PC during Core Module system start to enter bootloader console
U-Boot recovery
See U-Boot recovery for i.MX6_Q/D/DL/S/ULL via JTAG
U-boot console commands
SPI Flash
- SPI Flash Init
sf probe
- Example:
sf probe
- Description: Initializes the OnBoard SPI Flash
- SPI Flash Read
sf read <SDRAM address> <SPI Flash address> <Bytes>
- Example:
sf read 10000000 0 100
- Description: Copies 256Bytes from SPI Flash address 0x0 to SDRAM address 0x1000_0000
- SPI Flash Write
sf write <SDRAM address> <SPI Flash address> <Bytes>
- Example:
sf write 10000000 40000 10000
- Description: Copies 64kByte from SDRAM address 0x1000_0000 to SPI Flash address 0x4_0000
- SPI Flash Erase
sf erase <SPI Flash address> <Bytes>
- Example:
sf erase 100000 1000
- Description: Deletes SPI Flash content from address 0x10_0000 to 0x10_0FFF
- Note: The Bytes information needs to be sector size aligned!
NAND-Flash
- Read from NAND-Flash Device
nand read <SDRAM address> <NAND Flash address> <Bytes>
- Example:
nand read 80000000 400000 b40000
- Description: Copies 11,25MByte from NAND Flash address 0x40_0000 to SDRAM address 0x8000_0000
- Erase NAND-Flash blocks
nand erase <Block base address> <Bytes>
- Example:
nand erase 400000 40000
- Description: Deletes NAND Flash content from address 0x40_0000 to 0x43_FFFF
- Note: The Bytes information needs to be block size aligned!
- Write to NAND-Flash Device
nand write <SDRAM address> <NAND-Flash address> <Bytes>
- Example:
nand write 80000000 400000 b40000
- Description: Copies 11,25MByte from SDRAM address 0x8000_0000 to NAND Flash address 0x40_0000
- Note: The Bytes information needs to be page size aligned!
- Show bad NAND-Flash blocks
nand bad
- Description: Shows the bad NAND-Flash blocks.
- Show NAND-Flash content
nand dump <NAND-Flash address>
- Example:
nand dump 400000
- Description: Shows the content of the specified NAND-Flash block
UBI Filesystem
- Partition Definition
mtdparts
- Example:
mtdparts
- Description: Shows the current nand flash partitions. In case of i.MX6 one default partition set, which includes the entire flash. For linux that partition is used to create two volumes "boot" and "rootfs".
- Note: In case of UBIFS it is better to have one big partition with different volumes instead of many small partitions, because the wear leveling process is always applied to every partition.
device nand0 <gpmi-nand>, # parts = 1
 #: name                size            offset          mask_flags
 0: gpmi-nand           0x20000000      0x00000000      0
active partition: nand0,0 - (gpmi-nand) 0x20000000 @ 0x00000000
- Set or show active partition
ubi part <partition name>
- Example:
ubi part gpmi-nand
- Description: Show or set current partition. In i.MX6 default case this is shold always set to gpmi-nand.
- Show ubi layout information
ubi info layout
- Example:
ubi info layout
- Description: Display ubi layout information.
- Mount UBI volume
ubifsmount <UBI device>:<volume name>
- Example:
ubifsmount ubi0:boot
- Description: Mount UBIFS volume. The default name of the first i.MX6 volume is "boot".
- List files
ubifsls <directory>
- Example 1:
ubifsls
- Description: List files in a UBIFS directory.
- Load Files from UBI volume
ubifsload <SDRAM address> <directory+filename>
- Example 1:
ubifsload 10100000 zimage
- Description: Load file from an UBIFS filesystem to memory.
- Unmount UBI volume
ubifsumount
- Example:
ubifsumount
- Description: Unmount current volume.
SD/MMC Card
- Switch between MicroSD, SD Slot and eMMC
mmc dev <Slot number> <Partition number>
- Example:
mmc dev 0
- Description: Switch between SD/MMC Slots: 0 => SD/MMC Slot | 1 => MicroSD Slot | 2 => eMMC
- Note eMMC hardware partition number: 0 => User partition | 1 => first boot partition | 2 => second boot partition
- Initialize SD/MMC Card
mmc rescan
- Description: Initialize new inserted SD Card
- Show SD/MMC information
mmcinfo
- Description: Shows SD/MMC device information
Device: FSL_SDHC
Manufacturer ID: 45
OEM: 100
Name: SEM08
Tran Speed: 52000000
Rd Block Len: 512
MMC version 4.41
High Capacity: Yes
Capacity: 7.3 GiB
Bus Width: 8-bit
- Write to MicroSD, SD Slot and eMMC
mmc write <SDRAM address> <block number> <block count>
- Example:
mmc write 11000000 5000 400 - Description: Write 512kByte (device block size is 512Byte) to the eMMC offset 10MByte.
- Read from MicroSD, SD Slot and eMMC
mmc read <SDRAM address> <block number> <block count>
- Example:
mmc read 11000000 5000 400 - Description: Read 512kByte (device block size is 512Byte) from the eMMC offset 10MByte.
Filesystem
- NOTE: File system types are recognized automatically
- List files
ls <interface> <device[:partition]> <directory>
- Example 1:
ls mmc 1
- Example 2:
ls mmc 1 /folder
- Load Files from device to SDRAM
load <interface> <device[:partition]> <SDRAM address> <directory+filename>
- Example 1:
load mmc 1 10100000 nk.gz
- Example 2:
load mmc 1 10100000 /folder/nk.gz
Ethernet
- Load File via TFTP to SDRAM
tftp <SDRAM address> <directory+filename>
- Example:
tftp 80100000 nk.gz
- Example TFTP Server: "Winagents TFTP Server Manager"
- Note: For TFTP download it is necessary to config the ENV variables "ipaddr" and "serverip"
- Load File via TFTP to SDRAM using DHCP
dhcp <SDRAM address> <directory+filename>
- Example:
dhcp 80100000 nk.gz
- Example TFTP Server: "Winagents TFTP Server Manager"
- Note: It is necessary to config the ENV variable "serverip" with the ip-address of your TFTP-Server
- Ping
ping <IP address>
- Example:
ping 192.168.55.32
Unzip
unzip <source address> <destination address>
- Example:
unzip 12900000 10100000
- Note: The unzip command is supporting the gzip file format.
Bitmap
- Information
bmp info <Bitmap address>
Image size    : 800 x 480
Bits per pixel: 8
Compression   : 0
- Display
bmp display <Bitmap SDRAM address> [x y]
- Note: It is necessary to load bitmap file to memory address with an offset of an odd multiple of +2, since the use of a four-byte alignment will cause alignment exceptions at run-time.
Memory
- Display
md[.b, .w, .l] <address> [count]
- Example:
md.b 80100000 100
- Write
mw[.b, .w, .l] <address> <value> [count]
- Example:
mw.b 80100000 aa 100
- Description: Writes the value 0xaa to the next 0x100 bytes from the address 0x8010_0000.
- Copy
cp[.b, .w, .l] <source> <destination> <count>
Show DHCOM Settings
settings
- Example:
 VALIDATION_ID:    "DH"
 DISPLAY_ID:       0x00
 LENGTH:           0x2c
 X_RESOLUTION:     800 pixel
 Y_RESOLUTION:     480 pixel
 PIXEL_CLOCK:      22200 kHz
 LCD_CONFIG_FLAGS: 0x3e3
 HSW:              64 pixel clocks
 VSW:              2 line clocks
 HFP:              42 pixel clocks
 HBP:              86 pixel clocks
 VFP:              10 line clocks
 VBP:              33 line clocks
 DATALINES:        16
 ACB:              0
 ACBI:             0
 GPIO_DIR:         0x01ff
 GPIO_STATE:       0x0000
 HW_CONFIG_FLAGS:  0x001e
I2C
- Set current I2C bus
i2c dev <I2C bus>
- Example:
i2c dev 0
- Description: Set current I2C bus to 0.
Valid buses on i.MX6:
0 = DHCOM I2C port 1
1 = DHCOM I2C port 2
2 = i.MX6 OnBoard I2C port
- List available devices
i2c probe
- Description: Test for and show device(s) on the I2C bus.
Valid chip addresses: 32 50 51 52 53 58 59
- Read
i2c md <I2C address> <start address> <end address>
- Example:
i2c md 57 10 20
- Description: Reads 16 Bytes from the address 0x10 to address 0x20.
- Write
i2c mw <I2C address> <I2C register> <Value> <Bytes>
- Example:
i2c mw 57 0 aa 5
- Description: Writes 0xaa to 5 Bytes from the offset 0.
Environment
- Show ENV variables
env print
| or |
printenv
|
bootdelay=0
baudrate=38400
ipaddr=192.168.55.230
serverip=192.168.55.36
gatewayip=192.168.55.36
netmask=255.255.255.0
frias=5
...
Environment size: 449/262140 bytes
- Set ENV variables
env set <ENV name> <ENV value>
| or |
setenv <ENV name> <ENV value>
|
- Example:
env set ipaddr 192.168.55.2
- Note: If you need to edit "bootcmd" it is necessary to insert
;between the unique commands. Put the whole sequence in quotation marks'...'.
- Save ENV variables
env save
| or |
saveenv
|
- Delete ENV variable
env delete <ENV name>
- Revert to default ENV (all)
env default -a
- Import ENV from textfile
env import -t <SDRAM address> $filesize
- Example:
load mmc 0 0x10000000 uLinuxEnv.txtenv import -t 0x10000000 $filesize
- Important:
- The uLinuxEnv.txt file should have unix line ending. Also make sure that there is an empty line at the end of the file.
USB Mass Storage
- Use device as USB Mass Storage
ums <USB_controller> <devtype> <dev[:part]>
- Example: Write an image on PDK2 to the eMMC using the "ums" command:
- 1. Connect the USB OTG on the PDK2 with a suitable cable to a computer running Debian Linux
- 2. Go to the U-Boot console on the module
- 3. Start UMS by typing:
ums 0 mmc 2
- 4. Eject partitions that may appear
- 5. Double klick on the image (*.img.xz file)
- 6. Select a destination drive
- 7. Press "Start Restoring..."
- 8. Stop UMS in U-Boot by pressing CTRL+C
How to do Updates
Display and Hardware settings
DHCOM settings and Splash bitmap
- The DHCOM settings are used to setup display and special hardware parameters. For detailed description please have a look at How to create a settings.bin file.
- The DHCOM settings file and the splash bitmap are loaded via the env variables "load_settings_bin" and "load_splash" during startup from boot partition. The default content of these env variables is:
settings_bin_file=settings.bin
splash_file=splash.bmp
load_settings_bin=load mmc ${mmcdev}:${mmcpart} ${loadaddr} ${settings_bin_file}
load_splash=load mmc ${mmcdev}:${mmcpart} ${loadaddr} ${splash_file}
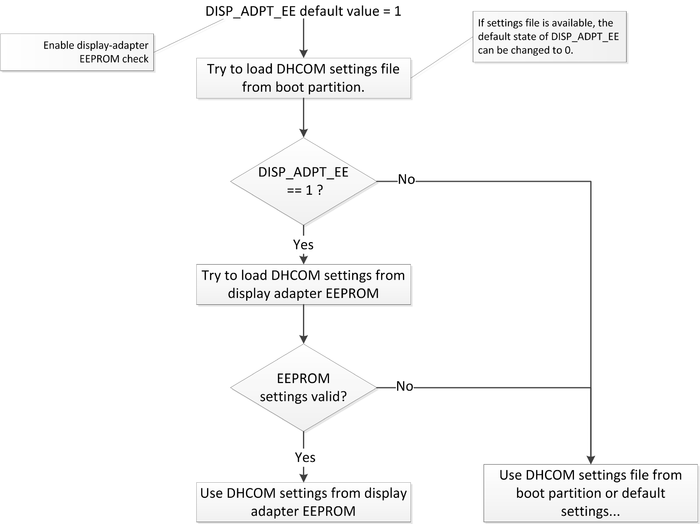
- Note: The DHCOM display settings can also be stored in external eeprom (address 0x50 / 7bit I2C address) which is connected to DHCOM I2C1 port. If eeprom is available and DISP_ADPT_EEPRM flag is set to 1, the settings from eeprom override the settings from boot partition!
- Next you can see the settings load order:

Displaying a splash screen with u-boot
Notes:
- This is possible with u-boot version v1.0.0.6 or newer.
- Only RGB interface and LVDS (only first channel) is supported.
- If you use lvds panel on vendor Kernel 3.10.17 the linux patch
“imx6 clk: Init LDB (lvds) parent clock“(19.Jan 2016) is needed, because otherwise the display isn’t working properly in linux.
(https://github.com/dh-electronics/linux-imx6-vendor/commit/6f7cabb4d7504c4d1cfe244d460f9891d5a0e411 )
The process to set it up is the following:
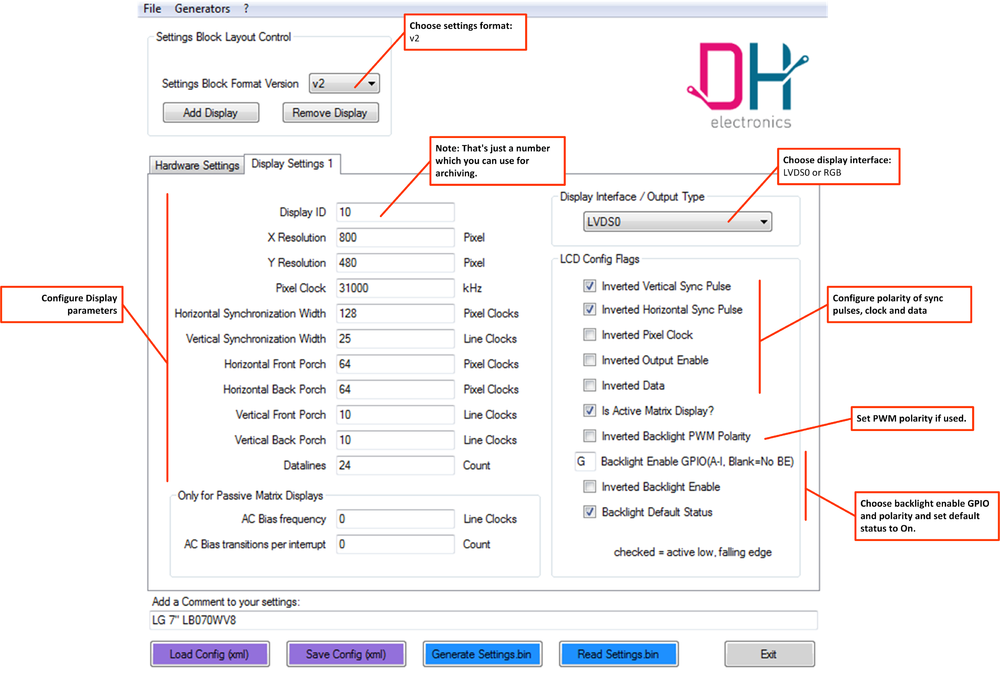
- Configure your display parameters with DHCOM settings generator (How to create a settings.bin file)
Here you can see an LVDS display example:
- Generate settings bin file with settings generator.
- Copy settings bin file to boot partition on boot media (eMMC, NAND or microSD card).
- Generate your splash bitmap (bitmap with 8 bit color depth).
- Copy also bmp file to boot partition.
- Start core module and enter u-boot console.
- Delete env variable “
panel”:env delete panel - Set env variable “
settings_bin_file” with settings bin filename:
Example:env set settings_bin_file 10_LG_7inch_LB070WV8.bin - Set env variable “
splash_file” with bitmap filename:
Example:env set splash_file 800x480_splash_DHCOM_iMX6.bmp - Save u-boot environment to flash:
saveenv - Restart the system --> Splash bitmap should now be displayed from the bootloader.
Generated Linux boot args for the display by u-boot
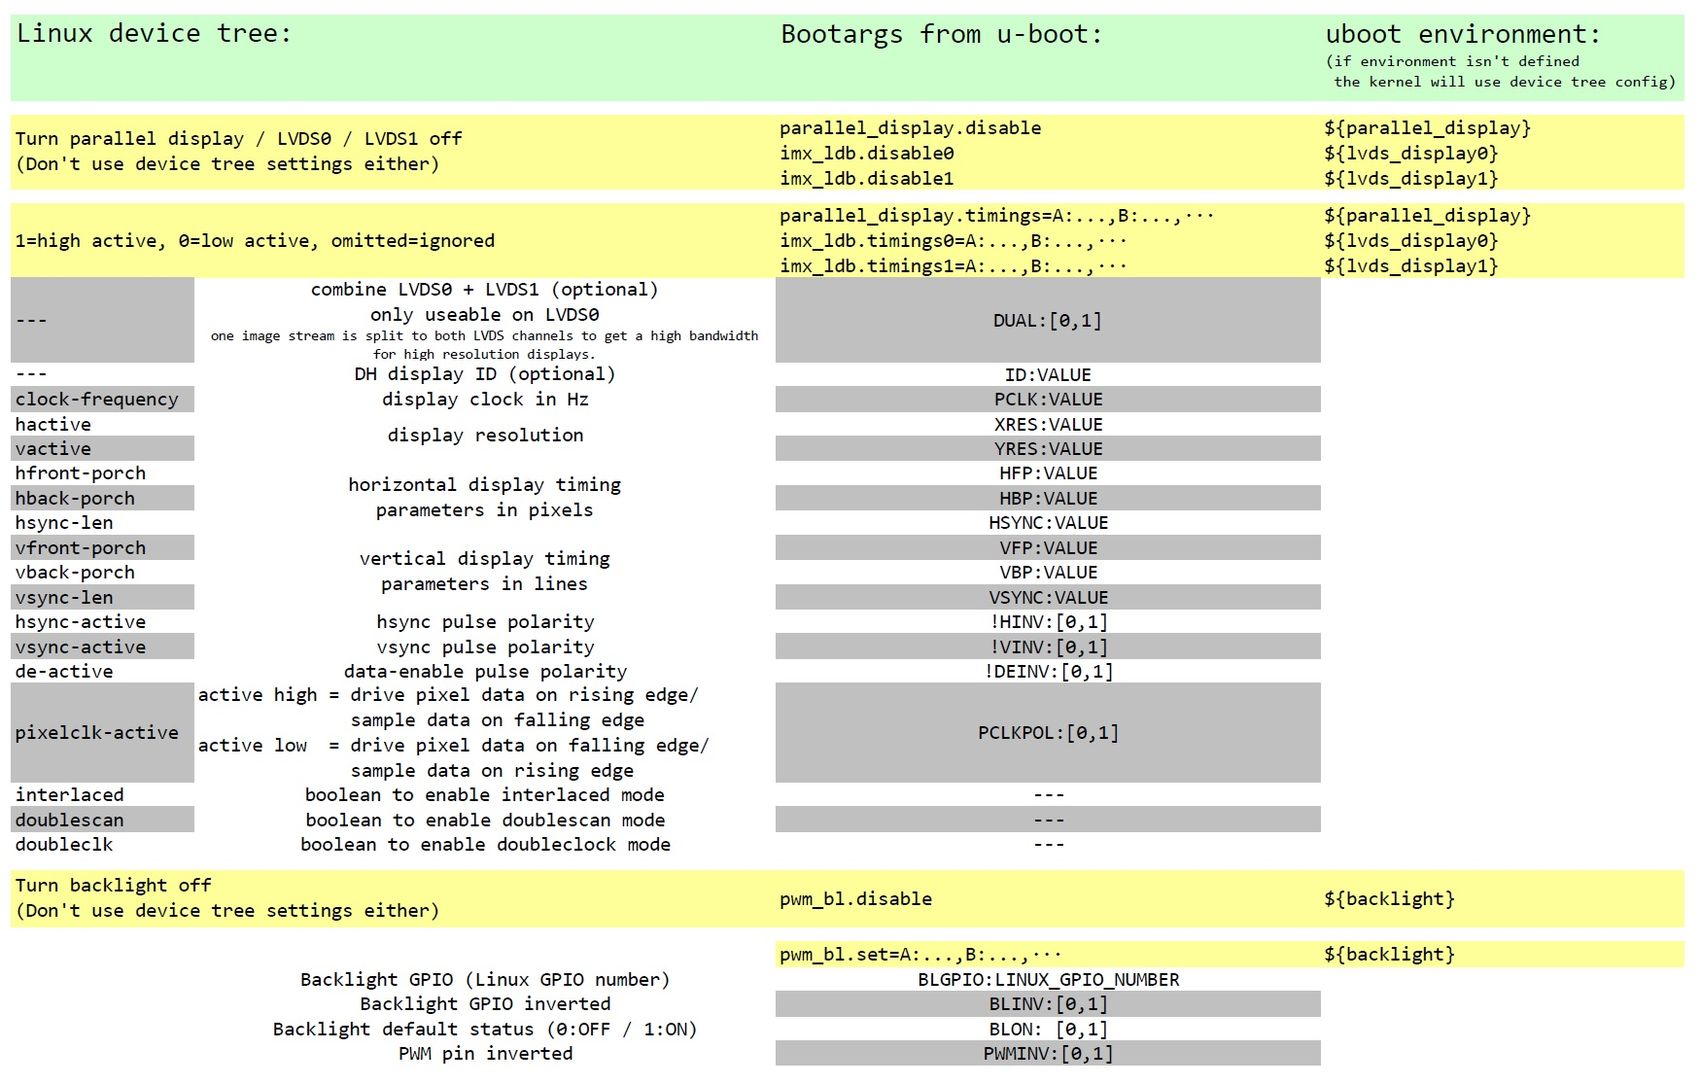
- U-boot is generating Linux boot args from the display settings file:
Display disabled by default
- With default u-boot configuration u-boot doesn't initialize the Display interface. This feature can be activated by deleting the "panel" environment variable. But also with deactivated display interface, the bootlaoder reads the display settings and pass the settings to the linux kernel.
panel="no_panel": Display interface is deactiveted in u-boot and backlight is powered off.
panel="RGB": Default DH 4,3" display is selected.
panel=deleted: u-boot initialize display by DH settings file.
Backlight enable GPIO
- If ENV variable "panel" is set to "no_panel" the backlight enable GPIO (defined via DHCOM settings file or eeprom settings) will be disabled from the bootloader during startup.
- If ENV variable "panel" is deleted, the backlight enable GPIO is activated or deactivated in relation to BL_ON flag of DHCOM settings file.
- Note: Supported by U-Boot DH VERSION v0.4.2.5 or higher for iMX6
Building U-Boot
Prepare Build Environment
|
1. Download and start the Virtual Machine for Application Development |
Get Sources
|
2. Start a terminal on Linux |
Start Build
|
6. # make ARCH=arm CROSS_COMPILE=/opt/gcc-linaro-6.3.1-2017.05-x86_64_arm-linux-gnueabihf/bin/arm-linux-gnueabihf- dh_imx6_defconfig |
Your new u-boot-with-spl.imx file is available in u-boot-imx6qdl/
Building U-Boot (based on v2015.10)
Prepare Build Environment
|
1. Download and start the Virtual Machine for Application Development |
Get Sources
|
2. Start a terminal on Linux |
Start Build
|
6. # ./uboot_make [q_d dl s s_1g] # add argument 'dl' to build for Duallite (if unsure contact DH electronics) |
- Your new u-boot.imx file is available in u-boot-imx6qdl/
- If your build does fail please check content of uboot_make and adjust PATH.
