DHCOM Update Mechanism: Difference between revisions
From Wiki-DB
Jump to navigationJump to search
Ageisreiter (talk | contribs) No edit summary |
Ageisreiter (talk | contribs) |
||
| Line 12: | Line 12: | ||
= Modes = | = Modes = | ||
== Automatically Update == | == Automatically Update == | ||
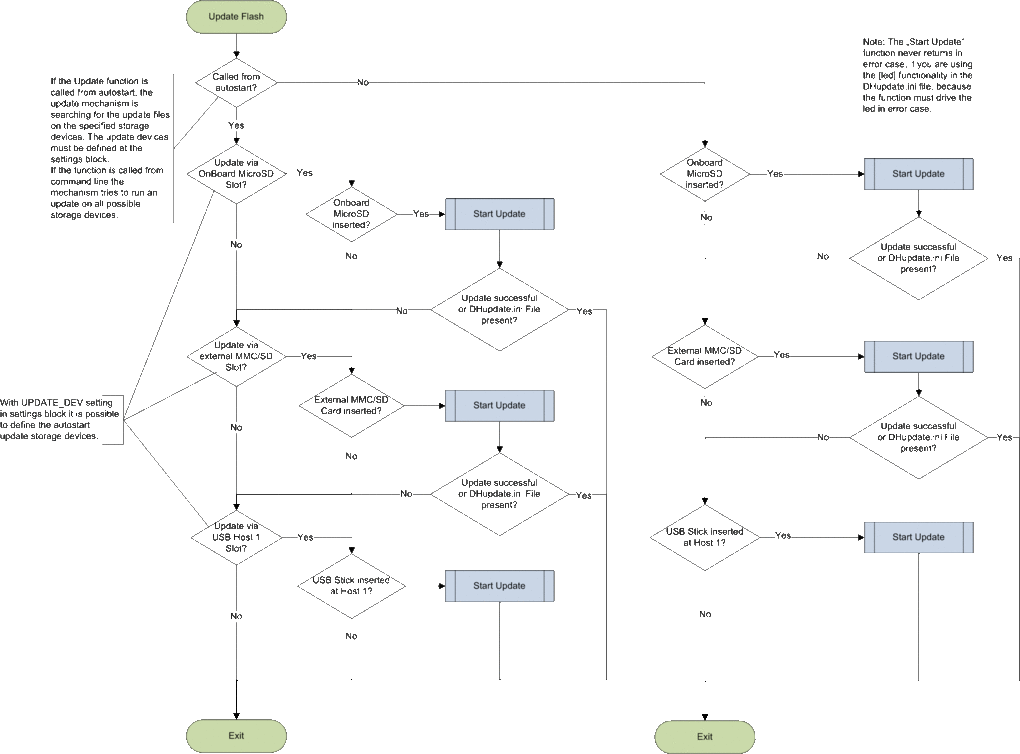
:Is called after the start of the bootloader if the environment variable '''bootcmd''' contains '''update auto'''. The functionality tries to update the flash content '''via the DHupdate.ini file''' (Please have a look at [[ | :Is called after the start of the bootloader if the environment variable '''bootcmd''' contains '''update auto'''. The functionality tries to update the flash content '''via the DHupdate.ini file''' (Please have a look at [[DHupdate.ini file]]). The update mechanism is searching for the update files on the specified storage devices. The update devices must be defined at the settings block (Please have a look at [[DHCOM Settings|DHCOM settings]]). With the DHupdate.ini file you have the possibility to run more then one updates, e.g. OS image and settings block. | ||
== Command line Update == | == Command line Update == | ||
Revision as of 15:10, 14 July 2014
The following updates are possible with the Bootloader:
- Bootloader
- Splashimage
- Settings
- Linux kernel
- Linux rootfilesystem
- Display adaptor EEPROM
Overview
Modes
Automatically Update
- Is called after the start of the bootloader if the environment variable bootcmd contains update auto. The functionality tries to update the flash content via the DHupdate.ini file (Please have a look at DHupdate.ini file). The update mechanism is searching for the update files on the specified storage devices. The update devices must be defined at the settings block (Please have a look at DHCOM settings). With the DHupdate.ini file you have the possibility to run more then one updates, e.g. OS image and settings block.
Command line Update
- Instruction: "update"
- The functionality tries to update the flash content via the DHupdate.ini file. In contrast to Automatically Update (which you can start with update auto) the update mechanism is searching on every available storage device for the update files.
- Instruction: "update <type> [filename]"
- The functionality doesn't use the DHupdate.ini file. It allows only one update and the update mechanism is searching on every available storage device for the update files. With the <type> parameter you have to specify the update type.
- The <type> parameter could be specified as follows:
- wince = WinCE image update + ENV update
- linux = Linux image update + ENV update
- Note: If you run
update linux, u-boot is searching for an update ENV script too. This script modifies the u-boot environment for Linux. The name of the script has to be the same as the kernel-image-name with the additional ending .env. You can also run an update without a script file. In this case u-boot only updates the kernel-image and the ENV remains unchanged. It is possible to update only the environment of u-boot without a kernel update by inserting the filename of the ENV script too.
- rootfs = Create or replace the linux root-filesystem which is stored in the NAND-Flash. The rootfs update has to be the last item (or second to last item if you insert the
resetcommand) in the DHupdate.ini file. For further Details: DHCOM Update: Linux Root Filesystem
- Note: To run a "NAND-Flash root-filesystem update" you need a special linux-kernel which must have the filename "uImage.update". This kernel must be available in the same diretory on your update-media as the DHupdate.ini file. Depending on your setup you have to update the u-boot environment too.
- bootloader = Bootloader update
- Note: The ENV in Flash memory is created on the first start of u-boot. If you run a bootloader update and the ENV at the new bootloader has changed, the ENV in Flash memory remains unchanged with the bootloader update. But you could delete the ENV block in flash memory before the update, then u-boot will create the new default ENV at the next start after the bootloader update.
- splash = Bootbitmap update
- settings = Settings block update
- Note: Please have a look at DHCOM settings.
- eeprom = Display adaptor EEPROM update with DH settings
- reset = Execute a reset after a successfull update. A reset can only be the last item in a DHupdate.ini file.
- Note: Be careful with the reset command. You can easily build a endless update loop by mistake.
- The [filename] parameter could be used to specify a non default filename. The default filenames are:
- wince = default file names nk.gz or nk.bin
- linux = default file name uImage + default script file name uImage.env
- rootfs = default file name fsroot.tar.gz
- bootloader = default file name u-boot.bin
- splash = default file name splash.bmp
- settings = default file name settings.bin
- eeprom = default file name eeprom.bin
- reset = no file to specify
DHupdate.ini file
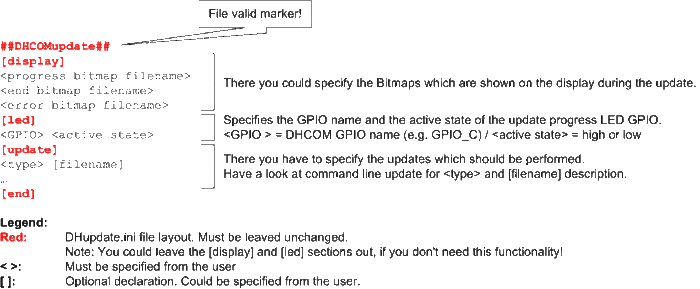
- The DHupdate.ini file is a text file, which describes the user specified update mechanism.
- The <type> parameter could be specified as follows:
- linux = Linux image update + ENV update
- Note: If you run
update linux, u-boot is searching for an update ENV script too. This script modifies the u-boot environment for Linux. The name of the script has to be the same as the kernel-image-name with the additional ending .env. You can also run an update without a script file. In this case u-boot only updates the kernel-image and the ENV remains unchanged. It is possible to update only the environment of u-boot without a kernel update by inserting the filename of the ENV script too.
- rootfs = Create or replace the linux root-filesystem which is stored in the NAND-Flash. The rootfs update has to be the last item (or second to last item if you insert the
resetcommand) in the DHupdate.ini file. For further Details: DHCOM Update: Linux Root Filesystem
- Note: To run a "NAND-Flash root-filesystem update" you need a special linux-kernel which must have the filename "uImage.update". This kernel must be available in the same diretory on your update-media as the DHupdate.ini file. Depending on your setup you have to update the u-boot environment too.
- bootloader = Bootloader update
- Note: The ENV in Flash memory is created on the first start of u-boot. If you run a bootloader update and the ENV at the new bootloader has changed, the ENV in Flash memory remains unchanged with the bootloader update. But you could delete the ENV block in flash memory before the update, then u-boot will create the new default ENV at the next start after the bootloader update.
- splash = Bootbitmap update
- settings = Settings block update
- Note: Please have a look at DHCOM settings.
- eeprom = Display adaptor EEPROM update with DH settings
- reset = Execute a reset after a successfull update. A reset can only be the last item in a DHupdate.ini file.
- Note: Be careful with the reset command. You can easily build a endless update loop by mistake.
- script = Run bootloader script file
- The [filename] parameter could be used to specify a non default filename. The default filenames are:
- wince = default file names nk.gz or nk.bin
- linux = default file name uImage + default script file name uImage.env
- rootfs = default file name fsroot.tar.gz
- bootloader = default file name u-boot.bin
- splash = default file name splash.bmp
- settings = default file name settings.bin
- eeprom = default file name eeprom.bin
- reset = no file to specify
- script = default file name script.bin
- For DHupdate.ini File Example, please have a look at the Please have a look at Download area iMX25 or Download area AM35x.
- Notes:
- If you update the DHCOM settings, it is possible to use the new settings for the update progress notifications on the display, by inserting the "refresh" command to the [update] section. Example:
[update]
settings 00_PV.bin
refresh
splash DH_800x480.bmp
...
[end]
- It is necessary to use UNIX End Of Line conversion!!!
- The order of the bitmap-filenames in the section
displaytells the system when to display which bitmap.
- Update progress LED description:
- The LED GPIO is activated as soon as update has started. This takes roughly 6 - 8 seconds. If the update was finished without an error, the LED GPIO is deactivated. If an error occurs during the update the LED GPIO begins blinking.
- LED error code:
- 1 LED blinking interval = DHupdate.ini File error (Wrong file content or no valid file found)
- 2 LED blinking interval = Necessary File for Update not found
- 3 LED blinking interval = Flash write or erase error
- 4 LED blinking interval = Wrong OS Image type (e.g. no WinCE *.gz or *.bin file)
- 5 LED blinking interval = Specified file not valid (e.g. linux *.env file)
- 6 LED blinking interval = Image file size is to large

