COM iMX6ULL Linux: Difference between revisions
| Line 1: | Line 1: | ||
== Storage Layout == | == Storage Layout == | ||
<br/> | <br/> | ||
::[[Image:DHCM_SPI_Boot_Flash_imx6ull.jpg| | ::[[Image:DHCM_SPI_Boot_Flash_imx6ull.jpg|1100px|DHCOM Boot Storage i.MX6ULL]] | ||
<br/> | <br/> | ||
:[[Image:DHCM_Storage_Layout_imx6ull.jpg|1000px|DHCOM Storage Layout i.MX6ULL]] | :[[Image:DHCM_Storage_Layout_imx6ull.jpg|1000px|DHCOM Storage Layout i.MX6ULL]] | ||
Revision as of 14:10, 17 March 2020
Storage Layout


Linux virtual machine for development
- Please have a look at: Virtual Machine for Application Development
Linux Kernel
Sources for the i.MX6 Kernel
- Mainline
- Vendor
How to build a Kernel
|
Get sources from Github
Configure and build the Device Tree + Kernel
|
Update the Kernel and Devicetree with U-Boot
- Please refere to the DHCOM Update Mechanism for i.MX6.
Update Kernel and Devicetree on a running Linux
Kernel
Devicetree
Reboot System
|
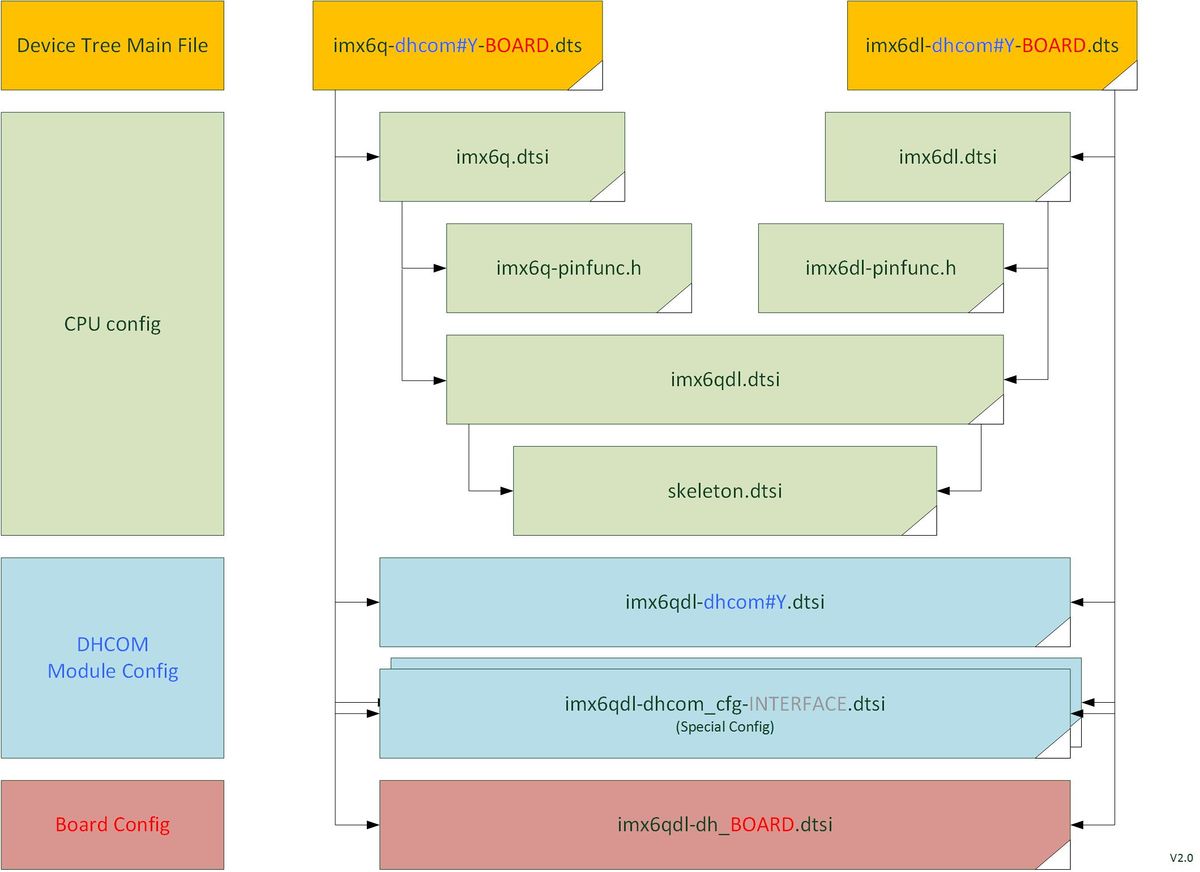
Make your own Device Tree for your board
- The recommended proceeding for making your our Device Tree should be the following:
- 1. Clone the DH Device Tree Board file and change it to fit for your board
- - Based on i.MX6 and PDK1 (works with i.MX6 HW200)
imx6qdl-dh_pdk1.dtsi --> imx6qdl-COMPANY_BOARDNAME.dtsi
- - Based on i.MX6 and PDK2 (works with i.MX6 HW300)
imx6qdl-dh_pdk2.dtsi --> imx6qdl-COMPANY_BOARDNAME.dtsi
- - Based on i.MX6 and PDK1 (works with i.MX6 HW200)
- 2. Clone the main Device Tree file and change the included boad file to yours
- E.g. based on i.MX6DL HW300 with PDK2
imx6dl-dhcom3B-pdk2.dts --> imx6dl-dhcom3B-BOARDNAME.dts
- E.g. based on i.MX6DL HW300 with PDK2
- 3. Add your new main Device Tree file to
Makefile(located in the same folder)
- DH Device Tree pattern:

Debian Rootfilesystem
Available Rootfilesystems
- Please have a look at the iMX6 Downloads section.
External Documentation
- The Debian Administrator's Handbook: A reference book presenting the Debian distribution, from initial installation to configuration of services. The administration and configuration chapters apply to our Debian based root filesystems.
- Debian Documentation
Login
Debian GNU/Linux 8 dhcom ttymxc0
dhcom login: root
Password: foo
Shutdown
# shutdown -h now
Calibrating the touchscreen (only on Debian 6.0)
# ts_calibrate
- Check the enviroment variable "TSLIB_TSDEVICE=/dev/input/event0" with printenv if an error occurs.
How to create a microSD-card with a rootfilesystem on it
- 1. Format a microSD card like following (in linux e.g. gparted, palimpsest) with Master Boot Record partition scheme
P1 ext3, name="boot" (Primary partition: 100MiB)
P2 ext3, name="rootfs" (Primary part.: Residual space)
- 2. Untar the root file system to the "rootfs" partition of the microSD card (Don't copy the tar archive directly to the microSD card)
Start the Console on Linux
# su
# chmod 755 /path/of/the/microSD_card
# cd /path/of/the/microSD_card
# tar xfjv path/to/RootFS/Name_of_RootFS_file.tar.bz2
- Remark: If you got a *.tar.gz file so type tar xfzv ... to extract the rootfilesystem.
Kernel Userspace Interfaces to Access Hardware
Serial (UART) Interfaces
DHCOM UART 1 /dev/ttymxc0 DHCOM UART 2 /dev/ttymxc1 DHCOM UART 3 <n/a>
I2C Interfaces
DHCOM I2C 1 /dev/i2c-1 DHCOM I2C 2 /dev/i2c-0
SPI Interfaces
DHCOM SPI 1 /dev/spidev0.0 DHCOM SPI 2 /dev/spidev1.0
- Remark: DHCOM SPI1 interface doesn‘t work with DHCOM Premium Developer Kit (HD00013).
- Reason: At DHCOM Premium Developer Kit SPI 1 isn‘t connected, because otherwise i.MX6 doesn‘t boot with the current schematic.
MMC/SD/eMMC Interfaces
DHCOM SD-Interface /dev/mmcblk1pX on module µSD Card on module eMMC /dev/mmcblk2pX
- 'X' has to be replaced with the partition number
Control the display brightness
- Coming soon
Control GPIOs
- See which gpio is already used by the system
cat /sys/kernel/debug/gpio | grep -v "gpio-... ( "
DHCOM Name: gpiod label: alt. DHCOM Name: SO-DIMM Pin# CPU Pad Name Linux <GPIO#> * GPIO A A 154 PAD_SNVS_TAMPER0 128 GPIO B B 156 PAD_SNVS_TAMPER1 129 GPIO C C 162 PAD_SNVS_TAMPER2 130 GPIO D D 163 PAD_SNVS_TAMPER3 131 GPIO E E 164 PAD_SNVS_TAMPER4 132 GPIO F F 165 PAD_SNVS_TAMPER7 135 GPIO G G 167 PAD_SNVS_TAMPER8 136 GPIO H H 173 PAD_SNVS_TAMPER9 137 GPIO I I 175 PAD_UART1_CTS_B 18 GPIO J J CIF HSYNC 74 PAD_CSI_HSYNC 116 GPIO K K CIF PCLK 72 PAD_CSI_PIXCLK 114 GPIO L L CIF MCLK 70 PAD_CSI_MCLK 113 GPIO M M CIF VSYNC 68 PAD_CSI_VSYNC 115 GPIO N N CIF D9 66 PAD_CSI_DATA07 124 GPIO O O CIF D8 64 PAD_CSI_DATA06 123 GPIO P P CIF D7 62 PAD_CSI_DATA05 122 GPIO Q Q CIF D6 60 PAD_CSI_DATA04 121 GPIO R R CIF D5 58 PAD_CSI_DATA03 120 GPIO S S CIF D4 56 PAD_CSI_DATA02 119 GPIO T T CIF D3 54 PAD_CSI_DATA01 118 GPIO U U CIF D2 52 PAD_CSI_DATA00 117 GPIO V CIF D1 50 <n/a> <n/a> GPIO W CIF D0 48 <n/a> <n/a> INT HIGHEST PRIORITY INT 151 PAD_KEY_COL0 11
- * = Valid if you didn't change the CONFIG_ARCH_NR_GPIO value in kernel config AND if your kernel doesn't probe another GPIO controller before the imx6 GPIO controller
- Remark: Depending on your board configuration some of the additional gpios shared with the camera interface are not available on your system.
- Controlled by gpiod tools (need Kernel v4.7 or higher)
- Set state
gpioset $(gpiofind GPIO_LABEL)=0 gpioset $(gpiofind GPIO_LABEL)=1
- Get state
gpioget $(gpiofind GPIO_LABEL) gpioget $(gpiofind GPIO_LABEL)
- Remark: GPIO_LABEL could be A, B, C, ... see table above
- Controlled by sysfs (since Kernel v4.8 deprecated)
- Export
echo <GPIO#> >/sys/class/gpio/export
- Remark: Have a look into /sys/class/gpio/ for already configured gpios.
- Set direction
echo in >/sys/class/gpio/gpio<GPIO#>/direction echo out >/sys/class/gpio/gpio<GPIO#>/direction
- Set state
echo 0 >/sys/class/gpio/gpio<GPIO#>/value echo 1 >/sys/class/gpio/gpio<GPIO#>/value
Initialize and Test CAN Interface
- Initialize:
ip link set can0 up type can bitrate 500000
- Send test message via cansend (part of can-utils):
cansend can0 100#11.2233.44556677.88
- Receive can messages (part of can-utils):
candump can0
- Get can-utils:
Parallel Address- / Databus
- To use the 16-bit address / databus from Linux userspace you can use the UIO driver interface. To enable and configure the interface it is necessary to setup the i.MX6 WEIM controller with the device tree. See the documentation of the device tree bindings of weim here.
- Here is an example code which demonstrates how to do enable and configure the WEIM interface (parallel address- / databus):
&weim {
	pinctrl-names = "default";
	pinctrl-0 = <&pinctrl_dhcom_weim &pinctrl_dhcom_weim_cs0 &pinctrl_dhcom_weim_cs1>;
	#address-cells = <2>;
	#size-cells = <1>;
	/* it is necessary to setup 2x 64MB otherwise setting gpr fails */
	ranges = <0 0  0x08000000  0x04000000>,					// Chip select 0 == DHCOM CS A
		 <1 0  0x0c000000  0x04000000>;					// Chip select 1 == DHCOM CS B
	fsl,weim-cs-gpr = <&gpr>;
	status = "okay";

	uiomap_cs0@0,0 {
		compatible = "generic-uio";
		reg = <0 0x00000000 0x04000000>;
		reg-names = "uio_cs0";
		interrupt-parent = <&gpio1>;
		interrupts = <2 2>;						// Add gpio A == interrupt
		#address-cells = <1>;
		#size-cells = <1>;
		fsl,weim-cs-timing = <0x00610089 0x00001002 0x0F011061
				      0x00000000 0x0F068A31 0x00000000>;
		status = "okay";
	};

	uiomap_cs1@0,1 {
		compatible = "generic-uio";
		reg = <1 0x00000000 0x04000000>;
		reg-names = "uio_cs1";
		interrupt-parent = <&gpio1>;
		interrupts = <4 2>;						// Add gpio B == interrupt
		#address-cells = <1>;
		#size-cells = <1>;
		fsl,weim-cs-timing = <0x00610089 0x00001002 0x0F011061
				      0x00000000 0x0F068A31 0x00000000>;
		status = "disabled";
	};
};
- We have already written some demo code at /arch/arm/boot/dts/imx6qdl-dhcom_cfg-weim.dtsi. It is easy to enable in the matching device-tree file:
- // #include "imx6qdl-dhcom_cfg-weim.dtsi
+ #include "imx6qdl-dhcom_cfg-weim.dtsi
- To use the generic uio driver it has to be enabled in the kernel configuration (
make menuconfig)- Device Drivers -> Userspace I/O Drivers -> Userspace I/O platform driver with generic IRQ handling
- The device-tree of_id of the uio driver has to be set via kernel command line
- Add "optargs='uio_pdrv_genirq.of_id=generic-uio'" to uLinuxEnv.txt
- Example for a UIO userspace driver:
- uio_access.cpp
- for further information have a look at the paper Userspace I/O drivers in a realtime context
Configure your own display
- To configure your own display you have to do the following steps:
- 1. Configure your display and build a settings file by our tool DHCOMSettingsGenerator (Download v2.0.0.2)
- 2. Place generated file into the first partition (label: "boot")
- 3. Create a symbolic link to the file settings.bin ($ ln -s YourSettingsFile.bin settings.bin)
- Remake: It is still possible to config the display via Device Tree e.g.
dev/4.4.60_dhcom/arch/arm/boot/dts/imx6qdl-dh_pdk2.dtsi(not recommended by DH)
- The following picture showing the sequence and priorities:


For detailed description of the display boot args please have a look at Display and Hardware settings of the iMX6 Bootloader.